TL;DR
- A Shopify blog has three layouts: the blog page that lists your posts, the template that frames every post, and the content inside each post. Each one changes in a different place.
- To change the blog post layout for every post, edit the Blog posts template in the theme editor. To give one post a different layout, create an alternate template and pick it in the post's Theme template menu.
- The rich text editor formats text but can't build columns or place products between paragraphs. A blog builder like vevy gives each post its own layout with drag-and-drop blocks, without code.
Contents
- What controls the blog post layout in Shopify?
- What you need
- Step 1: Change the layout of every blog post in the theme editor
- Step 2: Give some posts a different layout with an alternate template
- Step 3: Change the blog page layout (grid or list)
- Step 4: Change the layout inside a post
- Step 5: Edit the article template code (developer)
- Limits of the native approach
- Step 6: Change the layout inside each post with vevy (no code)
- Which method should you use?
- Common mistakes
- FAQ
- Conclusion
- Sources
You open a blog post on your store and want it to look different: the image smaller, the date gone, a product beside the text. Then you open the post in Shopify and find a text box with no layout options at all.
That’s because the blog post layout in Shopify doesn’t live in the post. To change blog post layout in Shopify, you edit the Blog posts template in the theme editor, create an alternate template for posts that need a different design, or use a blog builder like vevy to design each post block by block. This guide shows all six methods step by step.
What controls the blog post layout in Shopify?
A Shopify blog has three separate layouts. The blog page lists your posts and uses the Blogs template. Each post sits inside the Blog posts template, which sets the image, title, date and sections around it. The content inside the post comes from the rich text editor. You change each one in a different place.
| Layout | What it controls | Where you change it | Applies to |
|---|---|---|---|
| Blog page | How posts are listed: grid or list, images, dates | Theme editor, Blogs template | One blog, or every blog using that template |
| Blog post template | The frame around a post: featured image, title, author, share buttons, sections above and below | Theme editor, Blog posts template | Every post using that template |
| Post content | Headings, text, images, tables and anything placed between paragraphs | Content > Blog posts, or a blog builder app | One post |
Most layout problems come from changing the wrong one. If you want every post to show a smaller image, that’s the template. If you want a product in the middle of one post, that’s the content.
What you need
- Access to Online Store and Content in your Shopify admin
- An Online Store 2.0 theme, such as Dawn or Horizon, if you want sections and blocks in the blog templates
- About 15 minutes for the template steps, and a developer only if you want to edit theme code
- No code for Steps 1 to 4 and Step 6
Step 1: Change the layout of every blog post in the theme editor
After this step, every post that uses the default template has the new layout.
- In your Shopify admin, go to Online Store.
- Find your theme and click Edit theme.
- Open the page menu at the top of the editor (it starts on Home page) and choose Blog posts.
- Click the Blog post section in the left sidebar to see its blocks.
- Change the blocks, then click Save.
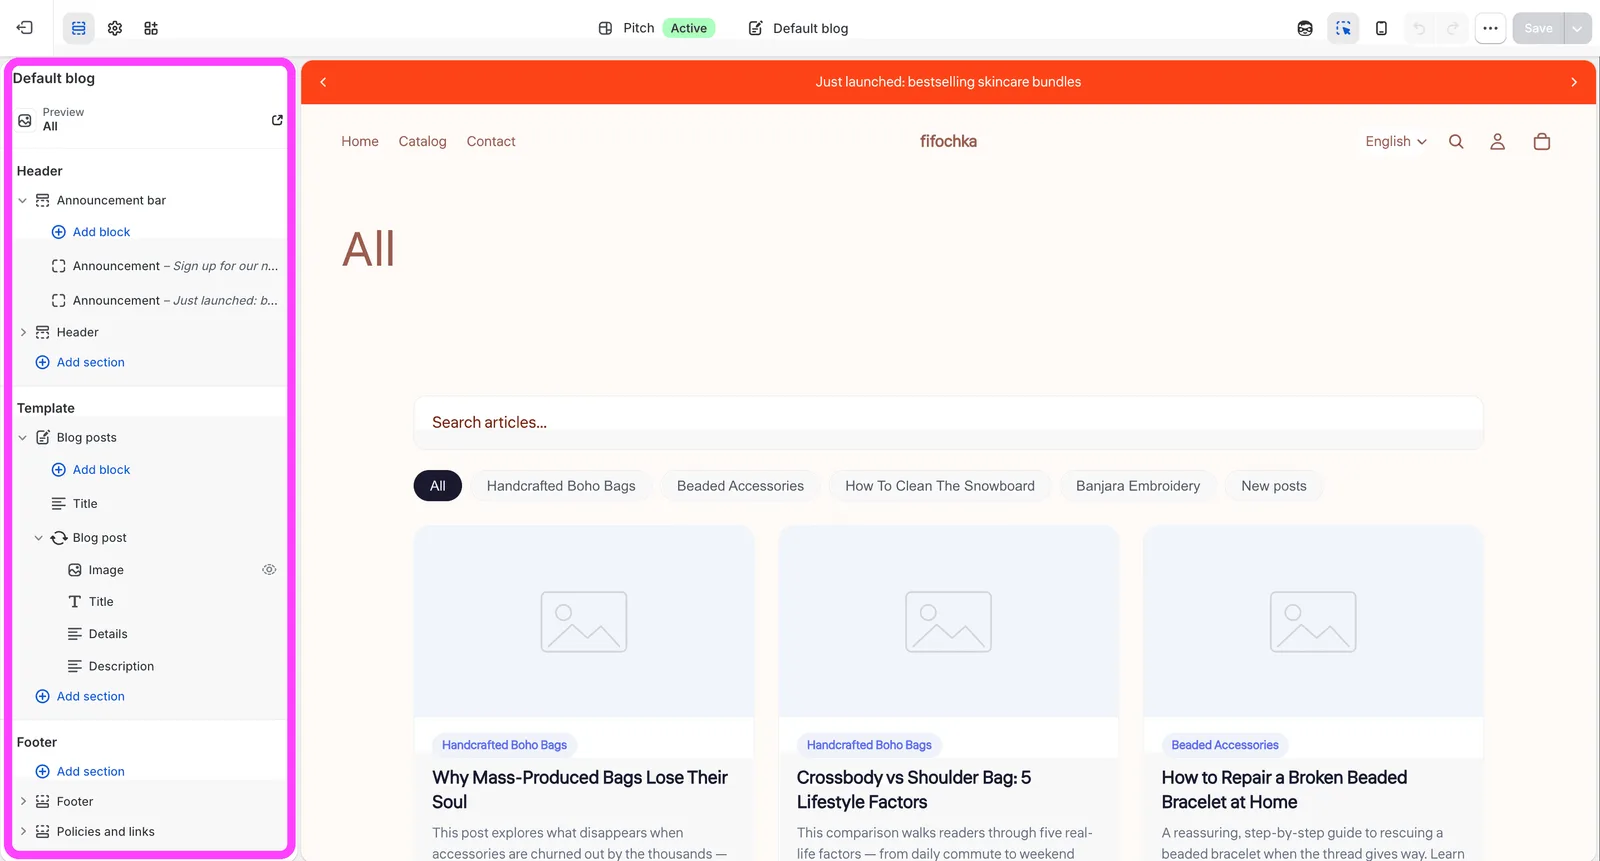
What you can change depends on your theme. In Dawn, Shopify’s free default theme, the Blog post section has four blocks: Featured image, Title, Content and Share. You can drag them into a new order, hide the ones you don’t want, set the featured image height to small, medium, large or adapt to image, and turn the date and author on or off in the Title block.
You can also add sections above or below the Blog post section, such as a newsletter signup or a featured collection. Newer themes like Horizon are built from theme blocks you can nest and rearrange, which gives you more room. Shopify also said in its Winter ’26 Edition that its Sidekick assistant can generate custom theme blocks from a prompt, in any Theme Store theme.
Verify: open two different posts on your live store. Both should show the new layout.
Step 2: Give some posts a different layout with an alternate template
After this step, chosen posts use their own layout while the rest stay the same. This is how you edit one blog article layout in Shopify without changing all of them.
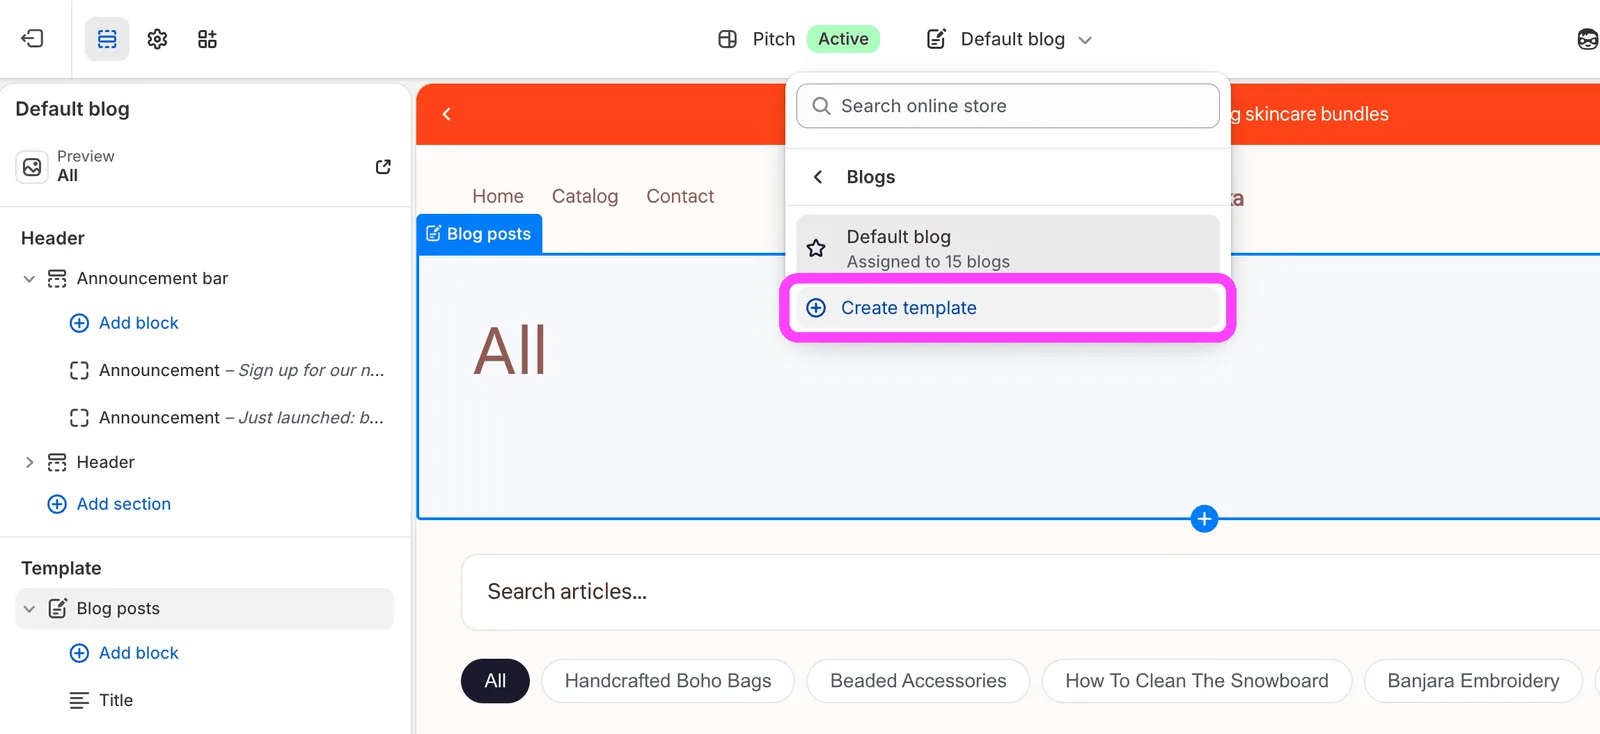
- In the theme editor, open the page menu and click Blog posts > Create template.
- Enter a name, such as “Buying guide”, and choose an existing template in the Based on menu.
- Click Create template, change its sections and blocks, and click Save.
- Go to Content > Blog posts and open the post you want to change.
- In the Online store section, open the Theme template menu, select your new template and click Save.
Shopify’s advanced publishing guide notes two things to keep in mind. The Theme template menu only lists templates from your live theme, and every post that uses the same template looks the same.
A common setup is one default template for news, one for buying guides with a featured collection at the end, and one for recipes or tutorials.
Verify: open the post you changed and one you didn’t. They should look different.
Step 3: Change the blog page layout (grid or list)
After this step, the page that lists your posts has a new look. This is the page at /blogs/your-blog-handle, and it’s what most “grid instead of list” questions are about.
- In the theme editor, open the page menu and choose Blogs.
- Click the main blog section (in Dawn, it’s called Blog posts).
- Change the layout settings and click Save.
In Dawn, the Layout setting offers Grid or Collage, and you can show or hide the featured image, set the image height, and turn the date and author on or off. Other themes use different names, and some have no layout option at all. When that happens, the change needs theme code or an app.
You can also give one blog its own layout. Create a template under Blogs > Create template, then go to Content > Blog posts, click Manage blogs, open the blog and select the template in its Theme template menu.
Verify: open the blog page on a phone as well as a desktop, because grid layouts often change to one column on small screens.
Step 4: Change the layout inside a post
After this step, the content of one post is laid out the way you want, within what the editor allows.
- Go to Content > Blog posts and open the post.
- Use the editor toolbar for headings, lists, links, images, tables and video.
- For anything the toolbar can’t do, click Show HTML and edit the HTML.
- Click Save.
Shopify’s guide to adding and managing blog posts lists what the editor supports. It formats text well, but it doesn’t build layouts. Two columns, a styled tip box or a product card beside a paragraph all need HTML and CSS, and Shopify’s own example of a product inside a post uses pasted Buy Button code.
Verify: preview the post on mobile. Custom HTML that looks fine on desktop often overflows on small screens.
Step 5: Edit the article template code (developer)
After this step, you can change anything in the post layout, but you also own that code from now on.
Single posts use your theme’s article template and its main section, main-article.liquid in Dawn. A developer can add new blocks, change the HTML structure or add settings that you then control in the theme editor. Some themes also have a Custom Liquid section, which lets you add small pieces of code in the theme editor without opening the code files.
Shopify warns in its guide to extending your theme that editing theme code can make your theme ineligible for automatic updates. Make a duplicate of your theme from the Themes page first, test the changes there, and keep a note of what you changed, because you’ll need to redo it when you switch themes.
Limits of the native approach
The theme editor and templates cover a lot, but they stop at a few clear points:
- A template applies the same layout to every post that uses it. You can’t place a product after paragraph four of one post with templates alone.
- Products, columns and styled boxes inside the content need HTML, which you have to maintain by hand in every post.
- Layout options depend on your theme. Two themes can have very different settings for the same page.
- Features like a table of contents, an author box or related posts only appear if your theme includes them.
Step 6 solves these limits without code. I also compare every way around them in how to fully customize Shopify blog posts.
Step 6: Change the layout inside each post with vevy (no code)
After this step, every post can have its own layout, with products, columns and reading tools placed exactly where you want them, without HTML or theme code. This is the only method in this guide that changes the layout of a single post block by block without code.
vevy Blog Builder is a drag-and-drop blog builder that runs inside your Shopify admin:
- Install vevy from the Shopify App Store and open it from Apps in your admin.
- Click Sync Shopify posts to bring in your existing posts, or click Create blog post to start a new one.
- Open a post. The editor opens with a rail of panels on the left.
- Click Elements and drag blocks into the post, such as Text & Product, Product Card, Product Grid, tables, galleries or an FAQ accordion.
- Click Layout and turn parts of the page on or off for this article: Table of contents, Sidebar product showcase, Author byline, Author box, Related articles and Comments.
- Click Templates to apply a ready-made layout, or Save as my template to reuse this design on other posts.
- Open the Saved menu in the toolbar and check that Sync saved changes to Shopify is on, so changes to published posts reach your store.
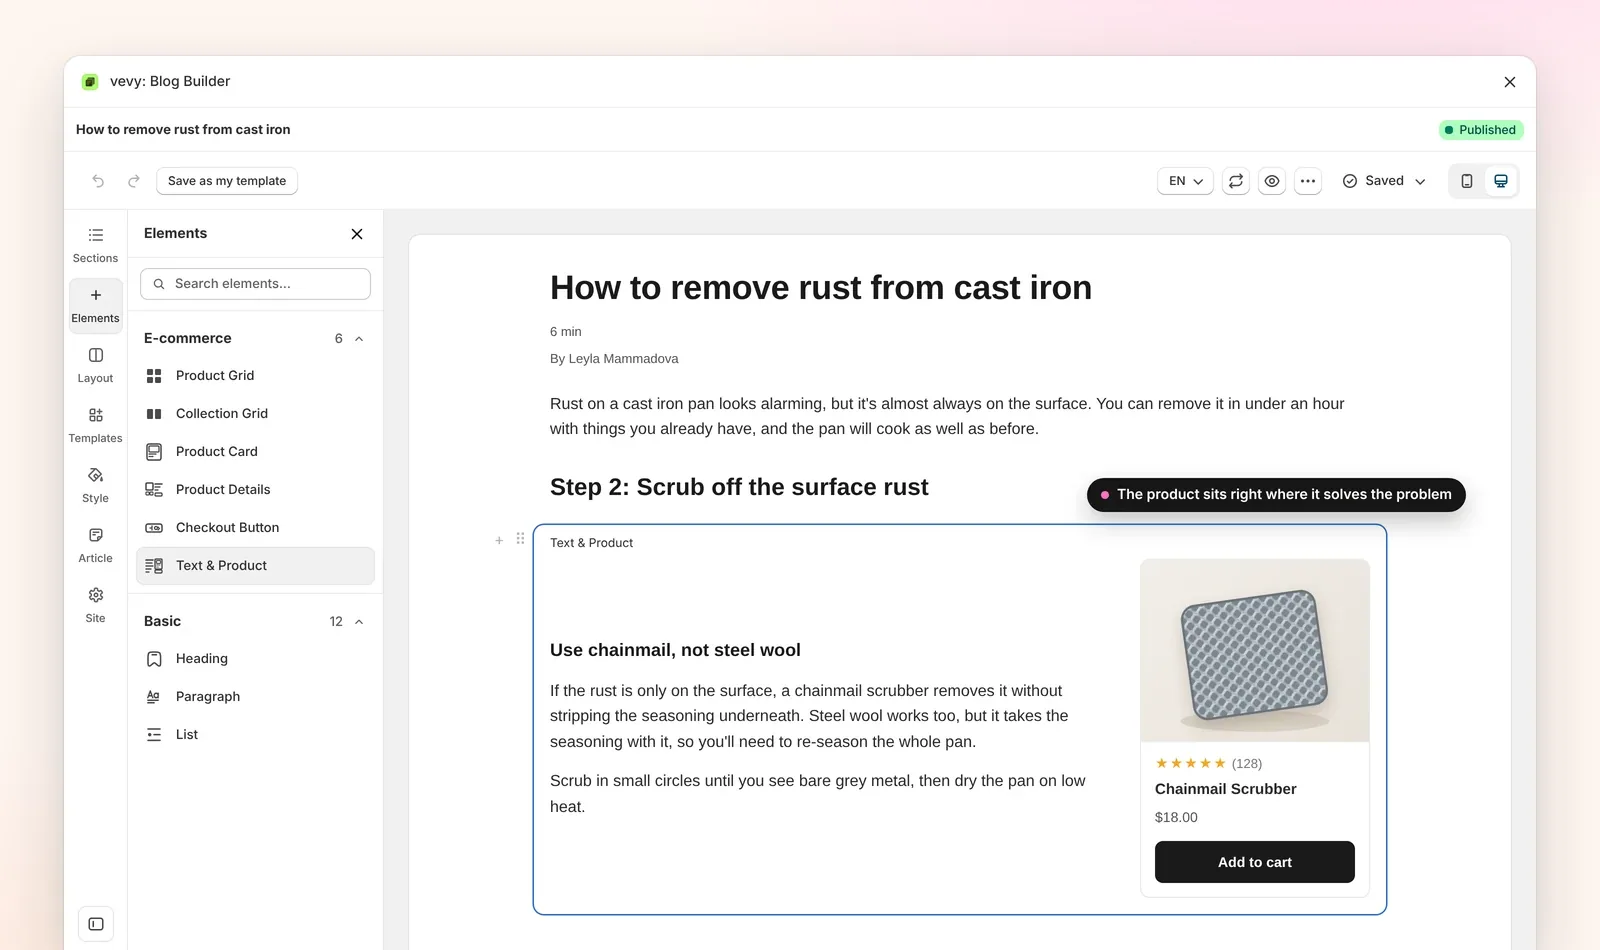
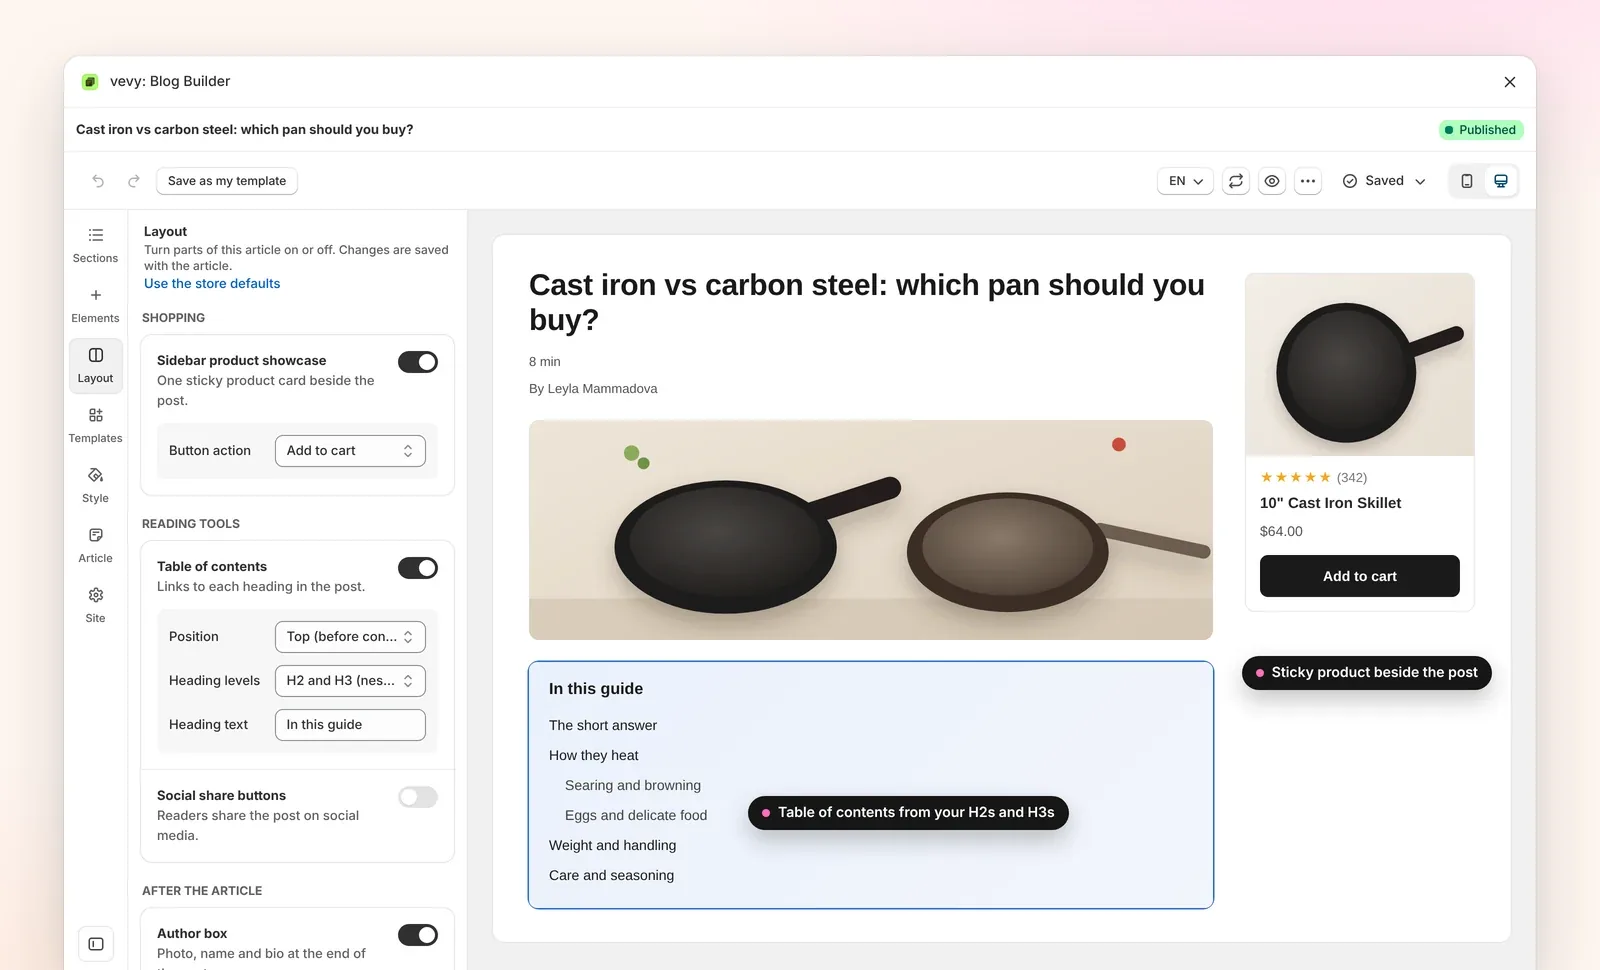
This covers every limit from the native methods. Each post gets its own layout instead of sharing one template, products sit between paragraphs as real product cards with live prices, and the table of contents, author box and related posts work even when your theme doesn’t include them. You can start from a ready-made blog template, and vevy picks up your theme’s colors, so posts match your store.
Your posts stay normal Shopify blog posts, so blogs, tags, URLs and search engine listings keep working. If you want to change the blog page too, vevy can create a blog home page with search and filters at /blogs/all.
One honest limitation: vevy shows on your storefront through an app embed, so if you switch themes you need to turn the embed on again in the new theme.
Verify: open the post on your live store, on desktop and on a phone. The blocks and layout parts you added should appear where you placed them.
Which method should you use?
| Method | What it changes | One post only | Products between paragraphs | Code needed |
|---|---|---|---|---|
| 1. Blog posts template | Every post | No | No | No |
| 2. Alternate template | A group of posts | Yes, through its template | No | No |
| 3. Blogs template | The list of posts | Not applicable | Not applicable | No |
| 4. Rich text editor and HTML | One post’s content | Yes | Only with HTML | Some HTML |
| 5. Theme code | Anything | Yes | Yes | Yes |
| 6. vevy Blog Builder | Each post’s content and layout parts | Yes | Yes | No |
If you only want a smaller image or no date on every post, Step 1 is enough. If you want each post designed for its topic, with products inside the content, vevy is the option built for that.
Common mistakes
Editing the Blogs template when you meant the post. The Blogs template changes the list of posts, not the post page. Check the page menu says Blog posts before you start.
Changing the layout in a theme that isn’t live. Alternate templates only show in the Theme template menu when they exist in your live theme. Create them in the published theme, or publish the duplicate first.
Giving every post its own template. Templates are for groups of posts. When each post needs a different layout, use blocks inside the content instead.
Forgetting mobile. A wide image or a two-column HTML block can break the layout on phones. Check every layout change on a small screen.
FAQ
How do I change the layout of a single blog post in Shopify?
Create an alternate blog post template in the theme editor under Blog posts, then Create template. Then open the post in Content, then Blog posts, choose the new template in the Theme template menu and save. For changes inside the content, such as products between paragraphs, use a blog builder like vevy, which gives each post its own layout without code.
Why can’t I find layout options for my Shopify blog?
Layout settings come from your theme, not from Shopify itself. Open the theme editor and choose Blog posts or Blogs in the page menu. If your theme has no layout settings there, you’ll need a newer theme, a developer to edit the template code, or an app that adds the layout options.
How do I change my Shopify blog from a list to a grid?
Open the theme editor, choose Blogs in the page menu and click the main blog section. Many themes, including Dawn, have a Layout setting with a grid option. If your theme only offers a list, the change needs custom code in the blog template or an app that replaces the blog page.
Does changing the blog post layout affect SEO?
Not by itself. Layout changes are safe as long as the main content, headings and links stay in the page’s HTML and the page loads quickly on mobile. Changing the template doesn’t change your post URLs. After a big change, check a post with the URL Inspection tool in Google Search Console.
Conclusion
To change blog post layout in Shopify, start in the theme editor: the Blog posts template changes every post, an alternate template changes a group of posts, and the Blogs template changes the list page. When you want each post designed on its own, with products inside the content, vevy does it with drag-and-drop blocks. Open your theme editor today to set the default, then design your most visited post in vevy.
Design each post's layout without code
Drag in product cards, Text & Product sections, tables and FAQ blocks, and turn on a table of contents per post.
Get for freeSources
- Shopify Help Center, “Advanced blog publishing” (blog post and blog templates), https://help.shopify.com/en/manual/online-store/blogs/publishing-blogs, retrieved 2026-11-17
- Shopify Help Center, “Adding and managing blog posts,” https://help.shopify.com/en/manual/online-store/blogs/writing-blogs/working-with-blog-posts, retrieved 2026-11-17
- Shopify Help Center, “Extending your theme,” https://help.shopify.com/en/manual/online-store/themes/extend/, retrieved 2026-11-17
- Shopify Help Center, “Adding Buy Button embed code to a website or blog,” https://help.shopify.com/en/manual/online-sales-channels/buy-button/add-embed-code, retrieved 2026-11-17
- Shopify, Dawn theme source (
sections/main-article.liquidandsections/main-blog.liquid), https://github.com/Shopify/dawn, retrieved 2026-11-17