Made for Shopify
Step-by-step SEO framework built for Shopify
AI SEO layer: Shopify Catalog, GEO, AEO & agentic commerce
Traditional SEO: technical, content, and conversion
Actionable checklists and a full topical-cluster content plan
1.1 Set up Google tools & other tools to use*
Before you start with technical SEO, first set up Google SEO tools. This will help you analyze your store’s current performance and compare results later. Google dominates the search engine market (around 90% globally) and many of the most powerful SEO tools it provides are actually free.
Setting up the following SEO tools will help you identify issues, fix problems, and optimize your Shopify store’s architecture for better performance.
Google Search Console (GSC)
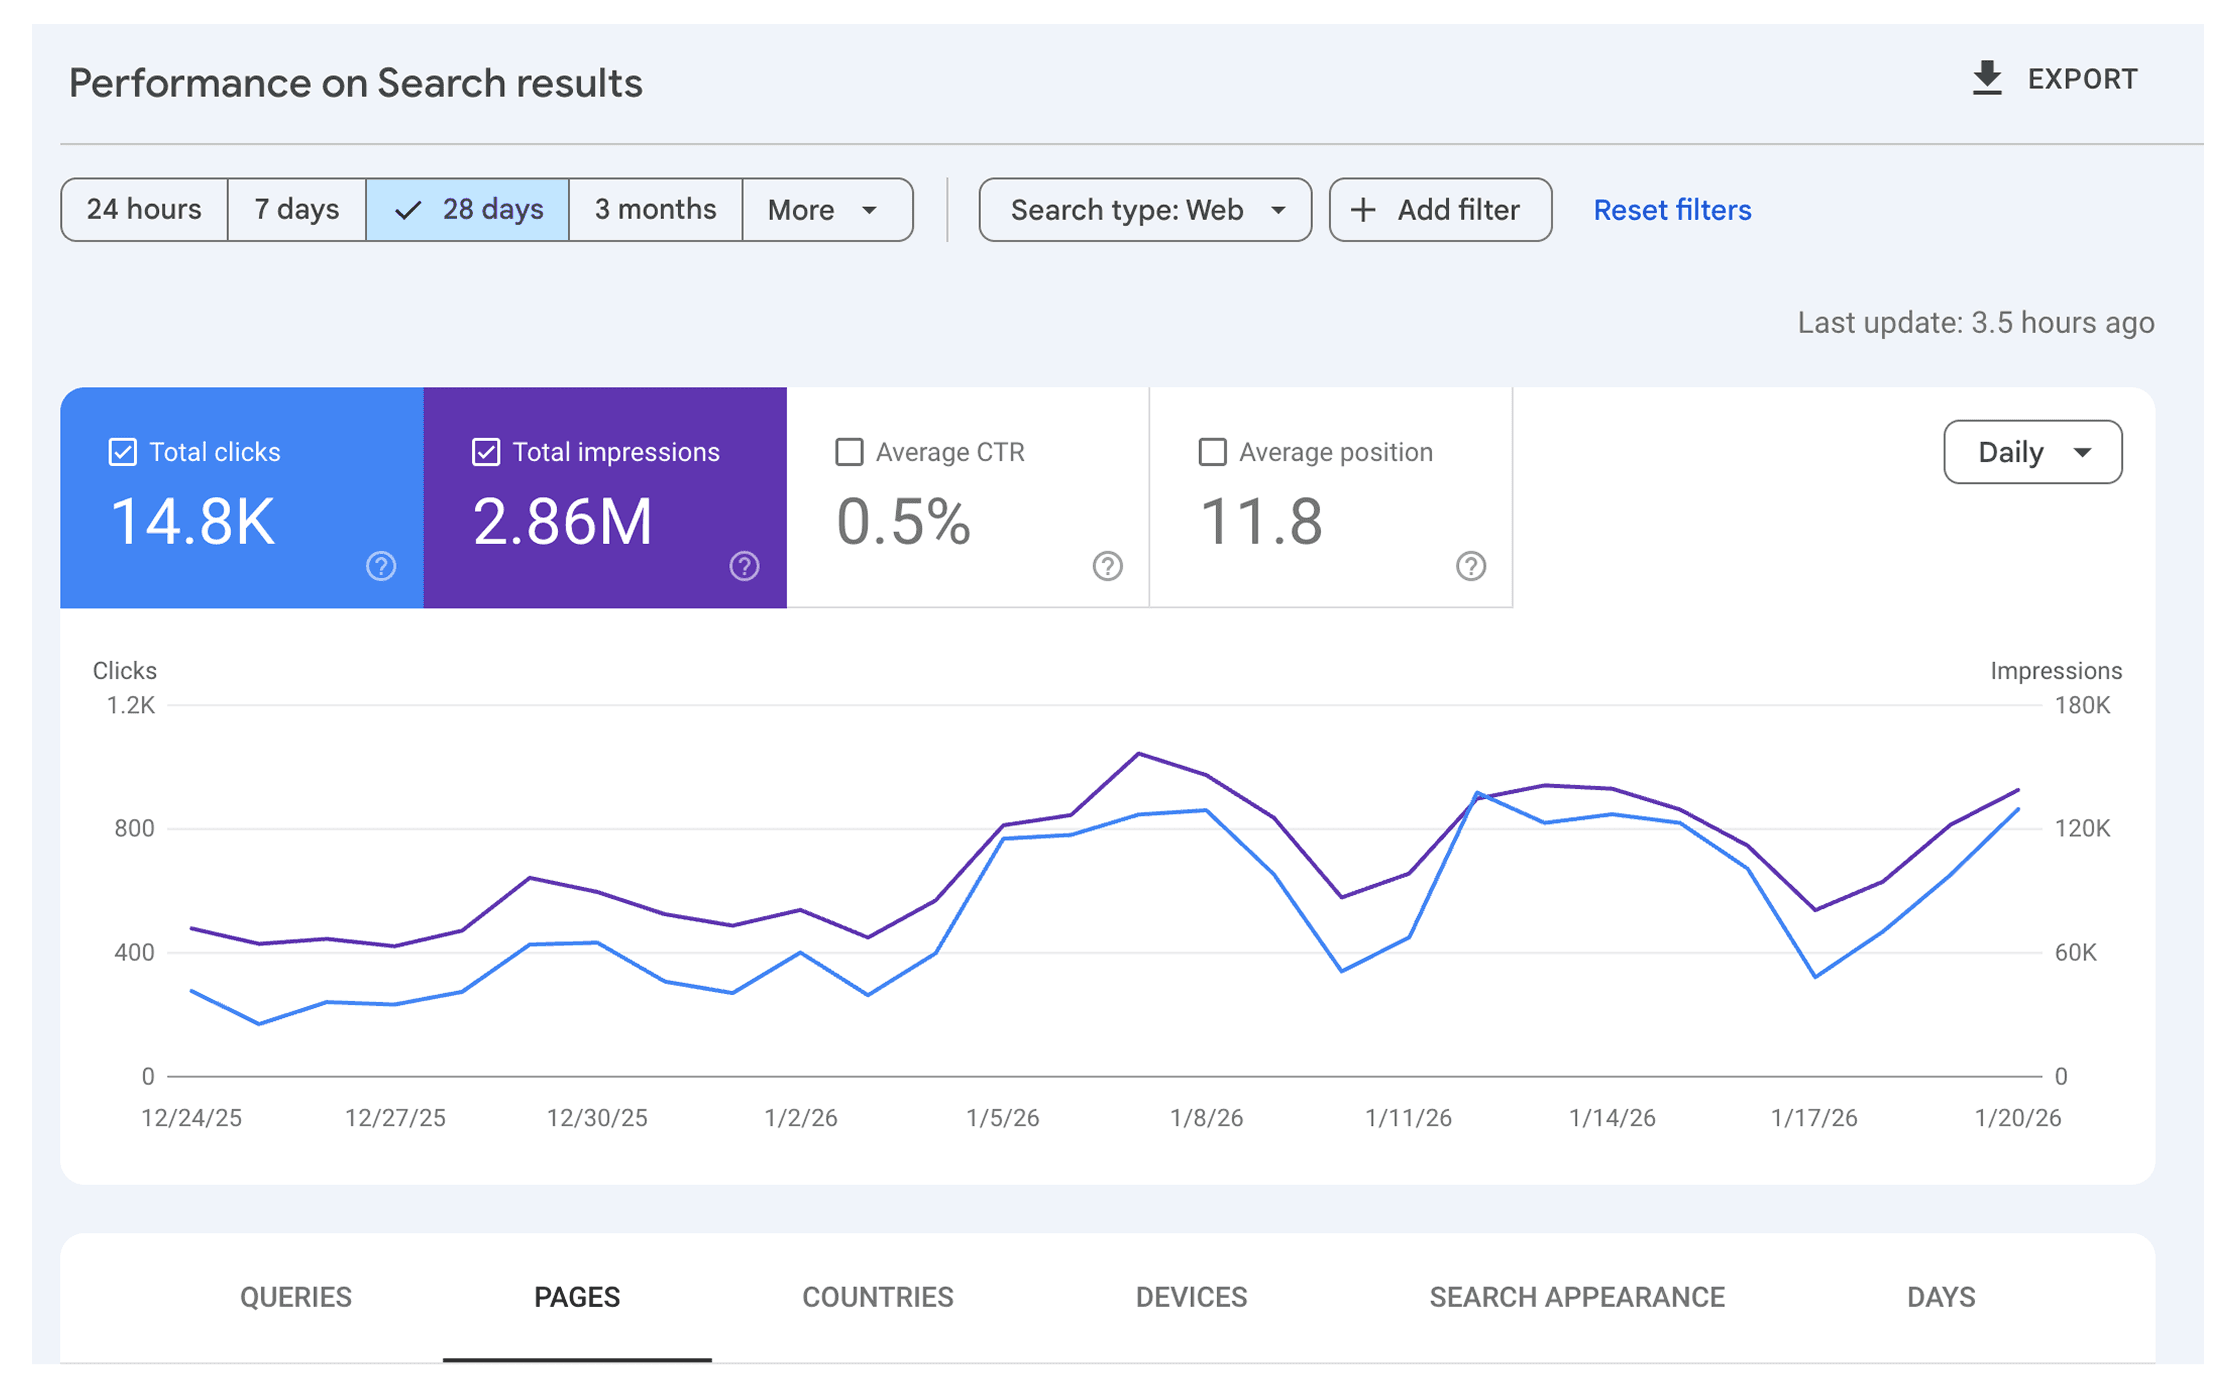
Google Search Console helps you monitor how many people see and click on your site in search results.
It shows which queries (words that are typed in the search input box) users use to reach your pages, identifies indexing errors, and lets you submit sitemaps so Google can find your store's pages faster. It also alerts you to security threats or manual penalties.
GSC is free to set up and use.
Google Analytics 4 (GA4)
Like Google Search Console, Google Analytics is also a free and powerful analytics tool. While GSC tells you what happens before someone clicks, GA4 tells you what they do after they arrive on your website.
Use GA to track conversions (such as purchases or newsletter sign-ups), see which traffic sources bring in the most revenue, and spot pages where users stay engaged and pages where they bounce (leave after viewing just one page).

Hreflang Tag Checker
If you sell internationally and generate multilanguage content, it’s important to tell search engines which language and country version of each page to show.
Hreflang Tag Checker is a free Chrome plugin that helps you check whether your hreflang tags are set up correctly across your pages. This tool verifies that search engines show the correct language version of your store to the right country.
Here's the link to the Hreflang tag Checker Chrome extension

1.2 Configure Shopify SEO basics
Set Your Preferred Domain (www or non-www)
Search engines often see www.yourstore.com and yourstore.com as two completely different websites. If you don’t set a primary domain, Google might get confused and think you are hosting duplicate content, which can waste your "crawl budget".
When you choose one version as your primary domain, this creates a "canonical" or representative URL that search engines will prioritize. Picking one version and sticking to it helps Google understand exactly which page is the "master copy" to show in search results.
To set a primary domain, in Shopify, go to Settings → Domains in your admin dashboard. Choose your preferred version (www or non-www) and click Set as primary domain. Shopify will automatically redirect the non-primary version to your chosen domain.

Enable HTTPS (Default Shopify SSL)
Security is a major "trust signal" for both customers and search engines. HTTPS is the secure version of the protocol used to send data between a web browser and a website. It uses an SSL certificate to encrypt sensitive info, like credit card details and passwords.
Shopify automatically provides free TSL (Transport Layer Security) certificates for domains that are added to Shopify. You just need to ensure it is active and that all your old "http" links correctly redirect to the new "https" versions so you don’t lose any "link equity" or authority.
In Shopify, go to Settings → Domains and check that SSL Pending is not shown and that your domain displays SSL enabled. Shopify automatically activates HTTPS and sets up redirects from HTTP to HTTPS once SSL is active. To be safe, review your store by visiting an old http:// URL and confirm it redirects to https://, ensuring no authority or traffic is lost.

Set Correct Store Language and Timezone
Google "sees" your site based on its location and settings. Setting your correct store language is vital because it helps search engines understand which geographic audience you are targeting.
Shopify uses code elements called hreflang tags to tell Google which language and region your site is intended for. This ensures that if a customer in Spain searches for you, they see the Spanish version of your site instead of the English one. While your timezone settings are primarily for your own backend data and order tracking, having them correct ensures your analytics data (like those in Google Analytics 4) is accurate, helping you make better SEO decisions based on when your traffic actually arrives.
Set Shopify store language via Settings > Languages to add/publish languages. Use the "Translate & Adapt" app for content translation and enable Geolocation to automatically switch languages based on customer location.

1.3 Help Google Access and Index Your Store (Crawlability & Indexation)
While your store might look great to a human, search engine bots see it differently. For your products to show up in search results, Google must be able to crawl (find your pages) and index (save them in its database).
Here is what to do for Google to find every single one of your products without getting lost.
Submit Your Sitemap.xml to Google Search Console
Shopify automatically creates a roadmap of your site called an XML sitemap at yourstore.com/sitemap.xml. This file lists all your important products, pages, and collections.
You should submit this URL directly to Google Search Console. This tells Google exactly where to find your content so it can index your pages much faster and more efficiently. Shopify even breaks this down into smaller sitemaps for things like "products" or "blogs" to keep everything organized for the bots.
In Google Search Console, go to Indexing → Sitemaps, then enter your sitemap URL (sitemap.xml) and submit it.

Block Internal Search URLs via Robots.txt
The robots.txt file is like a set of "keep out" signs for search engine bots. It tells them which parts of your site they should skip crawling.
Google gives every site a "crawl budget," which is a limit on how many pages it will look at. You don't want to waste that budget on low-value pages like internal search results, your cart, or the checkout page. Shopify creates a standard robots.txt for you, but you can customize it using a template called robots.txt.liquid to add specific "Disallow" rules.

To block internal search URLs, create a robots.txt.liquid template in your Shopify theme and add a Disallow rule for the search path (for example: /search). Then save and publish the theme, and confirm the rule by opening yourstore.com/robots.txt in your browser.
To check your crawl budget, on your Search Console, navigate to Settings → Crawling → Crawl Stats → Open report. In this report you can check how Googlebot visits your website. It helps you see if Google can access your pages properly and if your server is working well.

Prevent Duplicate Collection URLs
One of the biggest quirks with Shopify is that it often creates multiple links for the very same product. For example, a blue shirt might live at:
• yourstore.com/products/blue-shirt
• yourstore.com/collections/mens/products/blue-shirt
This creates duplicate content, which can confuse Google and potentially hurt your rankings. To fix this, you can edit your Shopify theme's code to remove the within: collection text from your product links. This forces Shopify to only use the simple, clean URL for every product.
In the Shopify admin, go to Online Store → Themes → … → Edit code, then search for product links that use within:
Replace those links with the direct product URL, typically {{ product.url }}:
This way, Shopify always outputs /products/product-handle instead of collection-based URLs. This change is usually made in files like product-grid-item.liquid, collection.liquid, or main-collection-product-grid.liquid.
After updating the links, Shopify’s existing canonical tags will correctly reinforce the single product URL. Finally, you should test collection pages to ensure navigation and breadcrumbs still work as expected.
2. Build clear site structure for your Shopify store
Site structure is how you organize pages, collections, products, and blog posts in your store and how they all connect to each other. It sounds simple, but if you get it wrong, Google struggles to understand what your store is about. And, when you get it right, Google can find every product you sell, understand how they relate to each other, and rank the right pages for the right searches.
The goal is a flat, logical structure where any page on your store can be reached in three clicks or fewer from the homepage.
Here is what a well-structured Shopify store looks like:
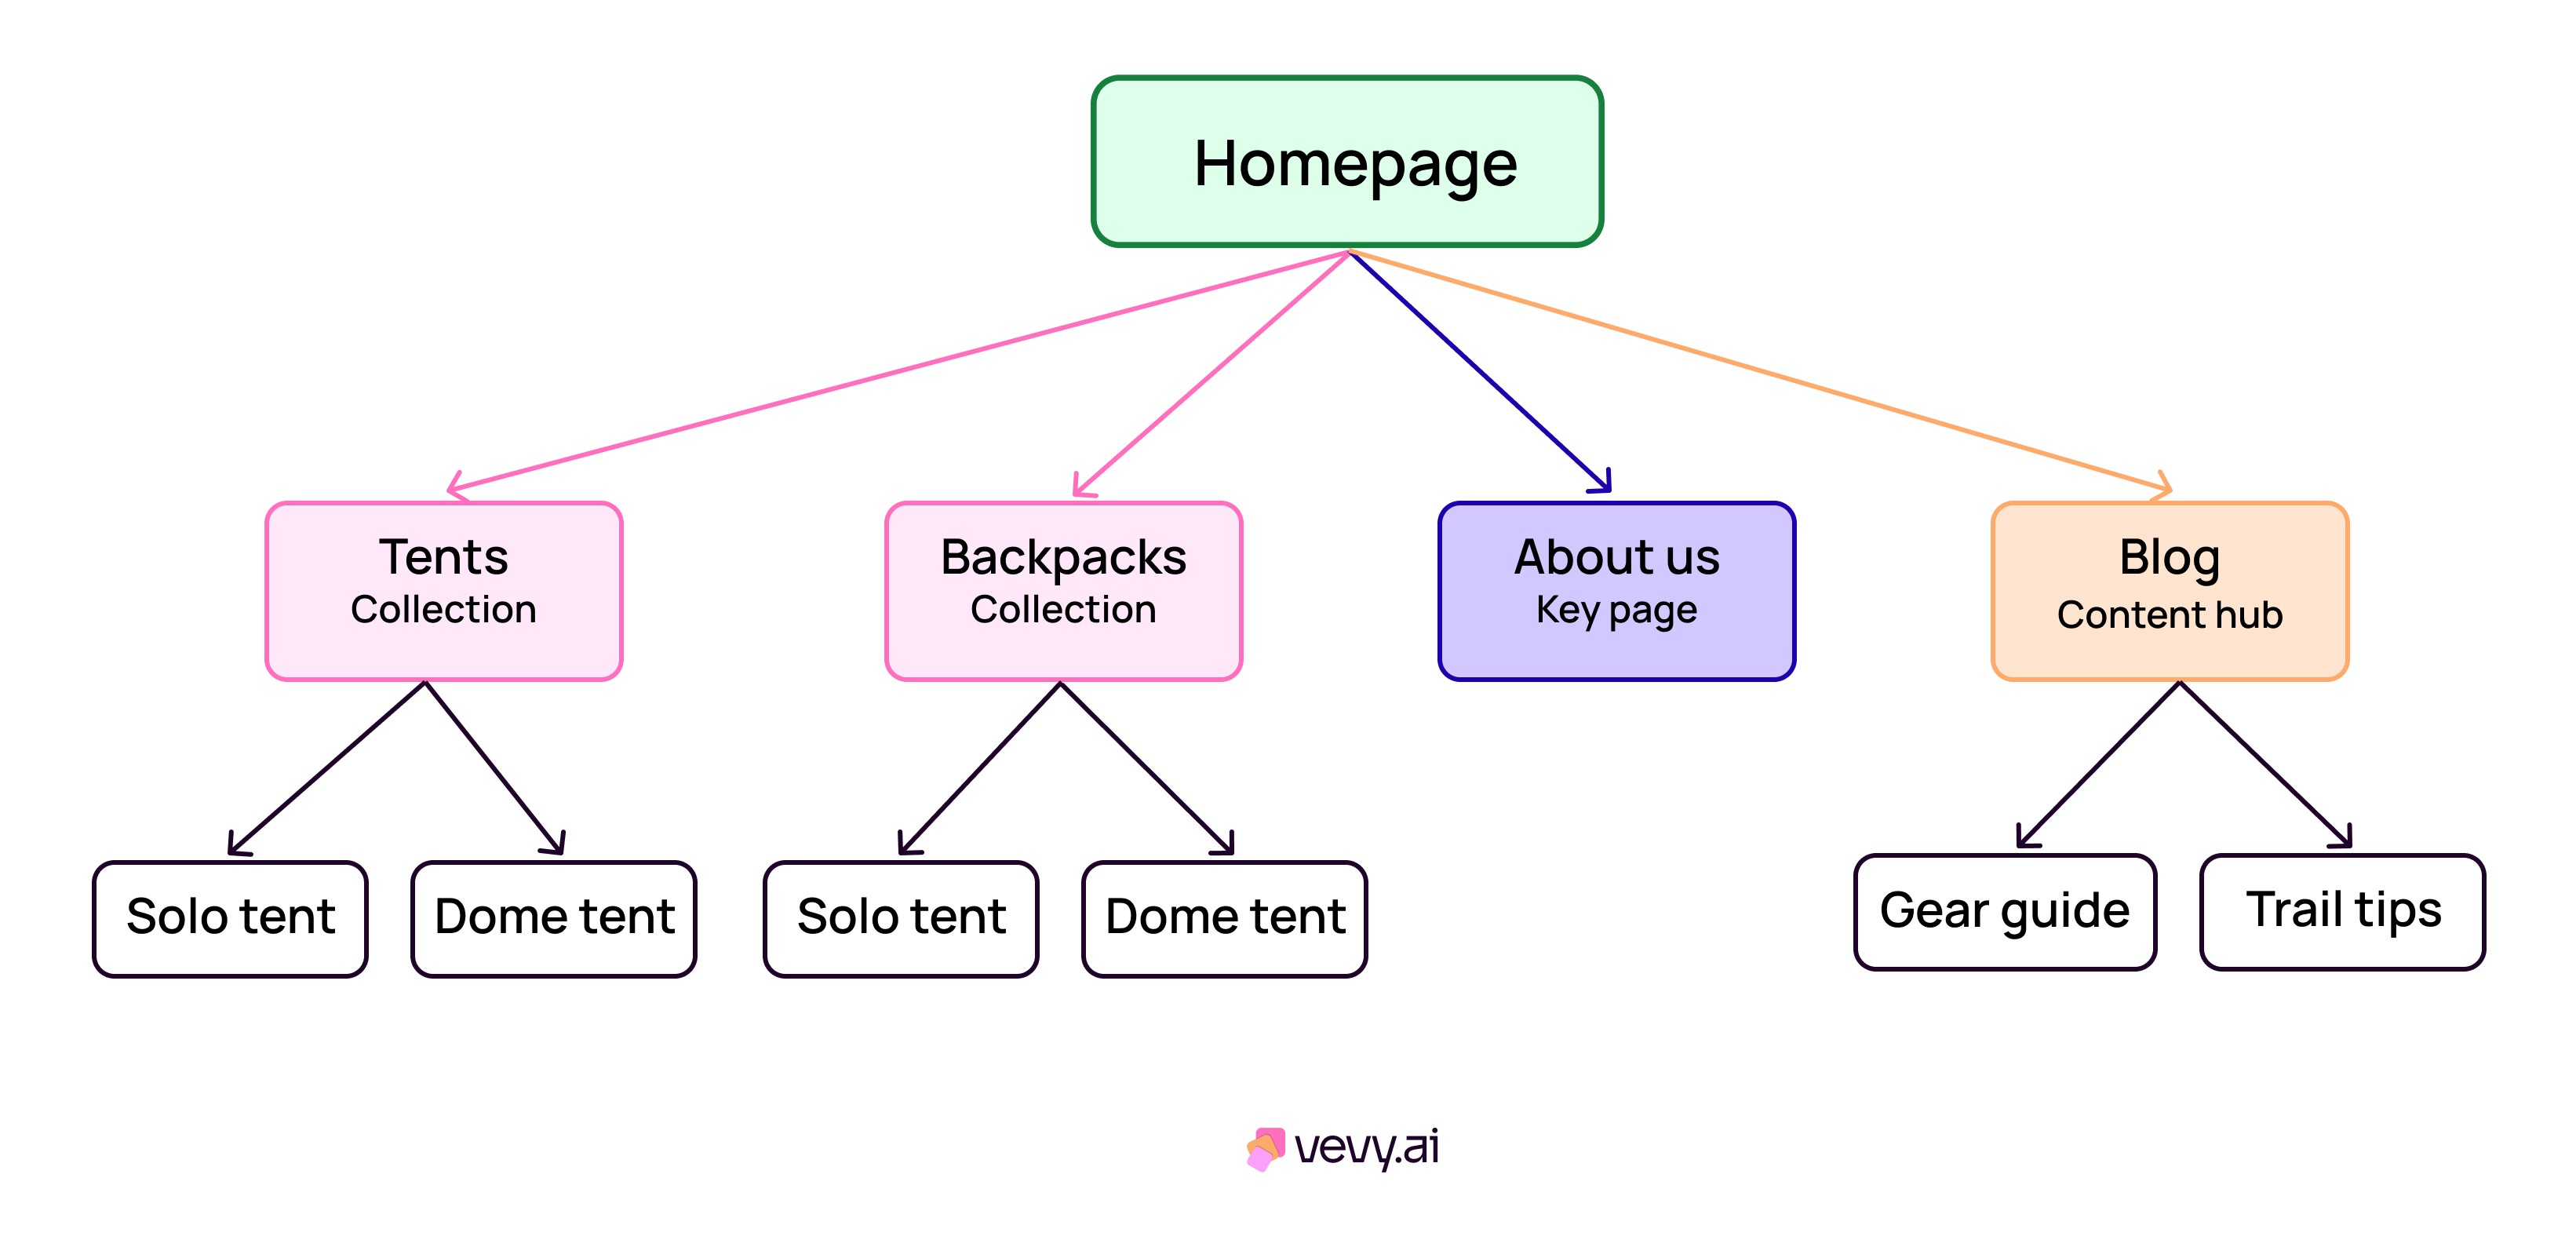
The diagram above shows three tiers. Your homepage sits at the top. Collections, key pages, and your blog sit one click below it. Individual products and blog posts sit one click below those. That's it. Three tiers, three clicks, and Google can reach everything.
You can use https://octopus.do/ sitemap generator to understand what your current site structure visually looks like.
Now let's look at each part in detail.
2.1 Plan your collections before you build them
Collections are the backbone of your store's structure. They are the equivalent of category pages, and they carry a lot of SEO weight because they target broader, high-volume keywords. And, the intent of those keywords are often informational, the kind of searches that people make when they are still browsing rather than ready to buy.
The most common mistake is creating too many collections with too much overlap. If you sell outdoor gear and you have separate collections for "waterproof jackets," "rain jackets," and "wet weather gear," Google does not know which one to rank. You end up competing against yourself.
A clean collection structure follows one simple rule: one clear topic, one collection. If two collections could reasonably contain the same products, merge them.
How to structure your collections in Shopify?
Keep your top-level collections broad and your sub-collections specific. For example:
/collections/tents: your main tents collection/collections/camping-tents: a sub-collection targeting a more specific search/collections/backpacking-tents: another specific sub-collection
Each of these targets a different keyword and a different type of shopper. The broader collection captures high-volume searches. The specific ones capture buyers who know exactly what they want.
To create and manage collections, go to Shopify Admin → Products → Collections.
2.2 Set up a clean navigation menu
Your navigation menu does two jobs:
It helps shoppers find what they are looking for.
It tells Google which pages on your store matter most.
Because Google treats navigation links as a strong signal of importance, every page you include in your main navigation gets a significant boost in authority.
This means you need to be selective. Do not add every collection to your navigation. Add the ones that matter most for your business and your SEO strategy.
How to set up navigation in Shopify
Go to Shopify Admin → Online Store → Navigation. You will see your main menu and footer menu listed here.
For your main menu, aim for no more than five to seven top-level items. Each item can have a dropdown with sub-items below it. This way, you can surface sub-collections without cluttering the top level.
A good main menu for an outdoor store might look like this:
Camping gear → Tents / Sleeping bags / Camp furniture
Hiking → Footwear / Backpacks / Navigation
Clothing → Waterproof jackets / Base layers / Fleece
Blog
About us
2.3 Add breadcrumbs to every page
Breadcrumbs are the trail of links you see near the top of a page that shows a visitor where they are in your store e.g., Home → Camping → Tents → Dome tents→ MSR Hubba Hubba 2-Person Tent.
Breadcrumbs help shoppers navigate your store easily. But they also serve an important SEO purpose: they reinforce your site structure for Google, and they are eligible for display in search results as part of your rich snippet. Rich snippets, in turn makes your listing look more organized and drives more clicks.
Most Shopify themes include breadcrumbs by default. To check whether yours does, visit a product page on your store and look for a trail of links near the top of the page. If they are missing, you can enable them in your theme settings or ask a developer to add them.
To check your breadcrumb markup is valid and eligible for rich results, paste a product URL into the Rich Results Test at search.google.com/test/rich-results.
2.4 Use your blog as a structural layer
Your blog should be a structural part of your store that actively links to your collection and product pages. Every blog post you write is a chance to point Google toward the pages you want to rank, pass authority to them through internal links, and capture top-of-funnel searchers who are not yet ready to buy but will be.
The most effective way to do this is with topic clusters. A topic cluster is a group of blog posts that all cover related topics and link back to a central collection or product page. For example:
A post on "how to choose a camping tent" links to your Tents collection
A post on "the best tents for camping in Norway" links to specific products
A post comparing "2-person vs 4-person tents" links to both
Each post drives traffic from a different type of search. All of them pass authority to your Tents collection page, the page you most want to rank.
2.5 Keep your URLs clean and consistent
Every page on your Shopify store has a URL. Those URLs should be short, descriptive, and consistent. A clean URL like /collections/waterproof-jackets tells both Google and shoppers exactly what the page is about before they even click on it. A URL like /collections/collection-abc123 tells them nothing.
Shopify generates URLs automatically based on the page title you give. This means getting your titles right from the start is important. Changing a URL later requires setting up a redirect, which may add complexity.
Here are the rules to follow:
Use hyphens between words, never underscores:
/waterproof-jacketsnot/waterproof_jacketsKeep URLs as short as possible while still being descriptive
Use lowercase letters only
Remove stop words where you can: words like "the," "and," "for" add length without adding meaning
Never change a URL once a page has rankings: always set up a 301 redirect if you must
To edit a page URL in Shopify, go to the page, collection, or product, scroll down to the Search engine listing section, and click Edit. Change the URL handle there.
2.6 Fix orphan pages
An orphan page is a page on your store that no other page links to. It is not in your navigation, not linked from any collection, and not mentioned in any blog post. Google can only find it if it is in your sitemap. Even if the orphan page is in your sitemap, it is unlikely to rank because it has no internal authority pointing toward it.
Orphan pages are more common than most store owners realize. They often appear after a store restructure, when old pages get removed from navigation but not deleted. They also appear when blog posts are published without any internal links connecting them to the rest of the site.
The easiest way to find orphan pages is to run a crawl with Screaming Frog (covered in Step 12) and filter for pages with zero inlinks. Once you have a list, either link to them from relevant pages or delete them if they serve no purpose.
Page speed is one of the few SEO factors where you can see a direct, measurable impact on both your rankings and your revenue. Google uses it as a ranking signal. And every second of delay costs you 7% drop in conversions. Research consistently shows that even a one-second improvement in load time can lift conversion rates by double digits on mobile.
Here is how slow website hurt your Shopify business:
85% of people leave mobile sites that are slow or do not work on their phones.
Over 50% of users leave a page that takes more than 3 seconds to load.
Speeding up your site by just 0.1 seconds can boost sales by 10%
For Shopify stores specifically, speed problems tend to come from the same handful of sources: too many apps, oversized images, and theme code that loads more than it needs to.
Here is what you need to know about page speed and core web vitals.
What are Core Web Vitals?
Core Web Vitals are the three speed metrics Google uses as ranking signals: Largest Contentful Paint (LCP), Interaction to Next Paint (INP), and Cumulative Layout Shift (CLS).
Core Web Vitals measure real user experience based on the actual data from people visiting your store using Chrome. All three metrics need to be in the "Good" range to pass Core Web Vitals. You can check your current scores in Google Search Console under Experience → Core Web Vitals report, or get a page-level breakdown in PageSpeed Insights.
For most Shopify stores, LCP is the metric that fails most often and it is usually the one that is easiest to fix.
How to measure and fix your Shopify store speed?
You can measure your Shopify store's speed with free tools by Google and Shopify and fix them yourself.
Check Core Web Vitals report in Google Search Console
Go to GSC → Experience → Core Web Vitals, or click here to open core Web Vitals report. This shows your real-world data aggregated from actual Chrome users visiting your store. It splits your pages into "Good," "Needs improvement," and "Poor" groups and tells you which specific URLs are failing and which metric is causing the problem.
This is the most important report to check because it reflects real user experience. A page might score 90 in PageSpeed Insights but still fail Core Web Vitals if real users on slower devices experience it differently.

Run PageSpeed Insights Test
Go to pagespeed.web.dev and paste in specific page URLs like your Shopify store's homepage, your most important collection page, or your most visited product page. Do not just test your homepage and call it done. Collection and product pages often have more images and heavier code than the homepage, and they are the pages most likely to rank for buying-intent keywords.
Always check the mobile tab. Google uses mobile performance for ranking decisions, and most Shopify stores score significantly lower on mobile than desktop.


Fix LCP first, it has the biggest impact
LCP measures how long the largest visible element takes to load. On most Shopify stores, this is the hero image on your homepage or the first product image on a collection page. Getting this under 2.5 seconds should be your first priority.
Compress and convert your images to WebP
Images are the number one cause of slow LCP on Shopify stores. A hero image that is 2MB will always cause a slow LCP, no matter how well everything else is optimised.
The fix is straightforward: compress every image before uploading it to Shopify, and use WebP format instead of JPEG or PNG. WebP files are typically 25 to 35 percent smaller than JPEG at the same visual quality.
Shopify automatically serves images in WebP format if you upload them through the theme editor or the Files section of your admin. But images uploaded via third-party apps or added directly to your theme code may not be converted automatically.
For bulk compression, use TinyIMG or Crush.pics from the Shopify App Store. Both crawl your existing images and compress them in batches without you having to manually re-upload anything.
Preload your hero image
Shopify loads resources in a specific order, and your hero image is sometimes not prioritised as early as it should be. You can tell the browser to load it as a top priority by adding a preload hint to your theme's <head> section.
In your Sales channels → Online Store → Edit code → theme code, go to the <head> section of your theme.liquid file and add:

This tells the browser to fetch the hero image immediately rather than waiting until it processes the rest of the page. On most stores this alone cuts LCP by 0.5 to 1 second.
This requires editing your theme code. If you are not comfortable doing this yourself, it is a small job for a Shopify developer.
Lazy load everything below the fold
Images that are not immediately visible when the page loads should not load immediately. This is called lazy loading: the browser only loads an image when the visitor scrolls near it.
Shopify 2.0 themes handle this automatically for most images. To check whether yours does, look at your product images in the page source and check for loading="lazy" on the image tags. If they are missing it, your theme may need an update or a code fix.
Reduce app bloat
Every Shopify app you install has the potential to slow your store down. Most apps inject JavaScript and CSS code into every page of your store, including the pages where the app does nothing at all. A popup app runs code on your product pages. A reviews app loads scripts on your homepage. A size guide app adds weight to pages it is never used on.
Most store owners underestimate how much this adds up. Ten apps each adding 50kb of code is 500kb of extra load on every single page.
The fix is ruthless: audit every app you have installed and remove anything you are not actively using and getting clear value from.
How to audit your Shopify apps?
Go to Shopify Admin → Apps and look at every app listed. For each one, ask: is this app earning its keep? If the answer is not an obvious yes, uninstall it.
Then run PageSpeed Insights on your homepage before and after removing each app. You will often find that one or two apps are responsible for the majority of your performance issues.
For apps you want to keep, check whether they offer a way to disable their code on pages where they are not needed. Some apps include an option to only load on specific page types — a review app only needs to load on product pages, for example.
Fix CLS: stop the page from jumping
CLS measures how much your page layout shifts while it loads. If you have ever visited a page where you went to click a button and it suddenly moved because an image loaded late, that is CLS. It is frustrating for shoppers and it is penalized by Google.
The most common causes on Shopify stores are:
Images without defined dimensions
When a browser loads an image without knowing how big it will be, it reserves no space for it. When the image finally loads, everything below it jumps down to make room. The fix is to always include width and height attributes on your image tags so the browser knows how much space to reserve before the image loads.
Most modern Shopify themes handle this correctly. If your Core Web Vitals report shows a CLS problem, check whether your theme's image tags include explicit width and height attributes, or update to a newer theme version.
Late-loading banners and announcement bars
If your theme loads an announcement bar or cookie consent banner after the page has already rendered, everything below it shifts down. This is a very common source of CLS on Shopify stores.
The fix is to ensure these elements are rendered server-side (included in the initial HTML) rather than injected by JavaScript after the page loads. If a third-party app adds your announcement bar, check whether it has a server-side rendering option or consider replacing it with a native theme feature.
Fonts loading late
When custom fonts load after the page renders, the browser first shows text in a fallback font and then swaps it for the custom font when it arrives. This text swap causes layout shift. Use font-display: swap in your font declarations and preload your most important font files so they arrive early.
Improve INP — make interactions feel instant
INP measures how quickly your store responds to shopper interactions such as taps, clicks, menu opens, filter selections. A store with poor INP feels sluggish and unresponsive, even if it loads quickly.
The most common causes on Shopify stores are heavy JavaScript from apps and themes that run complex code every time a user interacts with the page.
Defer non-critical JavaScript
JavaScript that does not need to run immediately should not run immediately. Add defer or async attributes to script tags for non-critical code such as analytics scripts, chat widgets, marketing pixels. So, they load after the main page content rather than blocking it.
In your theme.liquid file, look for third-party script tags and add defer to any that do not need to execute immediately:
Be careful with scripts that need to run before the page renders because adding defer to those will break functionality. Test thoroughly after any script changes.
Reduce main thread blocking time
If your PageSpeed Insights report shows a high "Total Blocking Time" score, it means JavaScript is occupying the browser's main thread for long stretches and as a result preventing it from responding to user input. This directly causes poor INP.
The most common culprit on Shopify stores is app code. Each app audit you do (removing unused apps, limiting where app code loads) will typically improve INP alongside LCP.
A practical speed improvement priority list for Shopify
If your store is currently failing Core Web Vitals and you are not sure where to start, work through this list in order. Each step is ranked by impact versus effort.
Highest impact, lowest effort:
Compress all images and convert to WebP using TinyIMG or Crush.pics
Remove every app you are not actively using
Check for and remove leftover app code after uninstalling
High impact, moderate effort:
Add explicit width and height to all image tags
Preload your hero image in
theme.liquidAdd
deferto non-critical third-party scripts
Moderate impact, requires developer:
Ensure announcement bars and banners are server-side rendered
Limit app scripts to load only on the page types where they are used
Upgrade to a Shopify 2.0 theme if you are still on a legacy theme
Ongoing:
Check PageSpeed Insights after every significant change to your store
Monitor the Core Web Vitals report in GSC monthly
Check the Shopify Speed Report after every app install or theme update
Product pages are where SEO turns into revenue. Every other page on your store — your homepage, your collections, your blog posts — exists to funnel shoppers toward a product page where they make a buying decision. Getting these pages right matters more than almost anything else you can do for your store's SEO.
There are two jobs a product page needs to do simultaneously. It needs to rank for the right searches. And it needs to convert the visitors it gets. Most SEO advice focuses only on the first job. This guide covers both.
Start with keyword research for each product
Before you write a single word, you need to know what your potential customers actually type into Google when they are looking for what you sell. This sounds obvious, but most store owners skip it — they write product titles and descriptions using their own language rather than the language their customers use.
The difference matters enormously. If you sell a "Hilleberg Nallo 2 GT" tent and your customers search for "lightweight 2 person backpacking tent," your product page needs to include both — the brand and model for customers who already know what they want, and the descriptive phrase for customers who are still searching.
How to find the right keywords
Start with Google. Type your product name into the search bar and look at the autocomplete suggestions — these are real searches people make. Then look at the "People also search for" section at the bottom of the results page. These variations tell you how real shoppers describe your product.
Then open Google Search Console. If your product page already has any rankings, the Queries report shows you every keyword it appears for. Filter by the product URL and sort by impressions — you will often find keywords you are already ranking for but have not actively optimised toward.
For each product page, identify:
One primary keyword — the main phrase you want the page to rank for
Two to four secondary keywords — related phrases and variations
The search intent — are people looking to buy, compare, or learn?
Write a title tag that earns the click
Your title tag is the blue link shoppers see in Google search results. It is the single most important on-page SEO element on your product page — and most Shopify stores get it wrong by defaulting to the product name alone.
A product name like "Nallo 2 GT" tells Google and shoppers almost nothing. A title tag like "Hilleberg Nallo 2 GT — Lightweight 2-Person Backpacking Tent | Your Store" tells them exactly what it is, who it is for, and where they are buying from.
Rules for a strong product title tag:
Include your primary keyword as close to the start as possible
Include the brand name and model number if relevant — these are what buyers search for
Add a short descriptive phrase that includes a key benefit or use case
Include your store name at the end, separated by a dash or pipe
Keep the whole thing under 60 characters — anything longer gets cut off in search results
To edit your title tag in Shopify, go to the product page, scroll down to the Search engine listing section, and click Edit. The title field there is your title tag — it is separate from your product title and does not affect how the product name appears in your store.
Write a meta description that sells the click
Your meta description is the short paragraph beneath your title tag in search results. Google does not use it as a ranking signal, but it has a direct impact on your click-through rate — which does affect your rankings indirectly.
A good meta description is not a summary of the product. It is an advertisement for the click. It gives the searcher a specific reason to choose your result over the four others on the page.
What to include:
Your primary keyword — Google bolds it in results when it matches the search
A key benefit or differentiator — what makes this product worth clicking on
A soft call to action — "free delivery," "in stock now," "buy today"
Keep it under 155 characters
A weak meta description: "The Hilleberg Nallo 2 GT is a high-quality tent suitable for backpacking trips."
A strong meta description: "The Nallo 2 GT is Hilleberg's lightest 2-person tent — 1.8kg, 4-season rated, freestanding. Free delivery. In stock now."
The second version is specific, credible, and gives the searcher concrete information that earns the click.
Write a product description that does real work
Most product descriptions on Shopify stores fall into one of two failure modes. They are either copied directly from the manufacturer — which means they are identical to dozens of other stores selling the same product, giving Google no reason to rank yours above theirs. Or they are so short they provide almost no useful information to either Google or the shopper.
A good product description does three things at once. It includes your target keywords naturally. It answers the questions a shopper would have before buying. And it gives Google enough substantive content to understand what the page is about.
How long should a product description be?
There is no fixed rule, but 200 to 500 words is a reasonable target for most products. Complex or high-value products — outdoor gear, technical equipment, furniture — warrant longer descriptions because shoppers need more information before they are ready to buy. Simple, low-consideration products can be shorter.
What to cover in your description:
What the product is and what it is designed for
The key features and what they actually mean for the buyer
Who it is best suited to — and who it is not suited to
Dimensions, weight, materials, and technical specs
What sets it apart from alternatives
Write it the way you would explain the product to a knowledgeable friend — honest, specific, and useful. Avoid vague marketing language like "premium quality" and "industry-leading" — it adds word count without adding meaning.
Structure your description for scannability
Most shoppers do not read product descriptions linearly. They scan for the information they need. Use short paragraphs, bullet points for key features, and bold text for the most important details.
A good structure for most product pages:
Two to three sentences introducing the product and its main purpose
A bullet list of key features with brief explanations of each
One paragraph covering who it is for and when to use it
Technical specifications in a clean table
Optimise your product title — the H1
Your product title in Shopify becomes the H1 heading on your product page — the most visible on-page text element after the images. It should include your primary keyword naturally while still reading like a real product name that a human would write.
For a product called "Nallo 2 GT," the title you set in Shopify admin should be something like "Hilleberg Nallo 2 GT Backpacking Tent" — not just the model name, but the model name plus the product category keyword.
This is separate from your SEO title tag. Your product title appears on the page itself, in your collections, and in your navigation. Your SEO title appears only in search results. Both matter, but they serve different purposes.
Get your product URL right
Shopify generates a URL handle automatically from your product title. Check every product URL and make sure it is:
Short and descriptive —
/products/hilleberg-nallo-2-gtnot/products/hilleberg-nallo-2-gt-2-person-4-season-freestanding-backpacking-tentLowercase with hyphens between words
Free of unnecessary stop words
Including your primary keyword where it fits naturally
To edit a product URL, go to the product in Shopify admin, scroll to Search engine listing, click Edit, and change the URL handle.
Write descriptive alt text for every product image
Alt text is the written description of an image that appears when the image cannot load, and that screen readers use for accessibility. It is also how Google understands what your images show — and it is how your images rank in Google Image Search, which drives meaningful traffic for many product categories.
Most Shopify stores either leave alt text completely blank or fill it with keyword-stuffed phrases like "buy cheap camping tent online free delivery." Both approaches are wrong.
Good alt text describes the image specifically and naturally, and includes the product name and a key detail about what the image shows.
Examples:
Bad: (blank)
Bad: "tent buy cheap camping gear"
Good: "Hilleberg Nallo 2 GT pitched on rocky terrain in winter conditions"
Good: "Nallo 2 GT inner tent showing sleeping area for two people"
To add alt text in Shopify, go to a product, click on an image, and click the Alt text button that appears. Add a unique description for each image — different images of the same product should have different alt text describing what each one specifically shows.
Add structured data to your product pages
Structured data is code that tells Google the specific details of your product — its name, price, availability, and review ratings. When set up correctly, Google can display this information directly in search results as rich snippets — the product listings that show a price, a star rating, and a stock status beneath the title.
Rich snippets make your listing stand out from every plain blue link on the page. They improve click-through rate significantly, especially for products with strong review scores.
Most Shopify themes include basic product structured data automatically using the Product schema type. To check whether yours does, paste a product URL into the Rich Results Test at search.google.com/test/rich-results. If your structured data is valid, the tool will show you a preview of how your product could appear in search results.
If the test shows errors, your theme may need updating or you may need a structured data app. Schema Plus for SEO and TinyIMG both handle product structured data reliably without requiring code changes.
What to include in your product structured data:
Product name
Description
Brand
SKU or MPN (manufacturer part number)
Price and currency
Availability (in stock, out of stock, pre-order)
Review ratings — if you have product reviews, make sure they are included
Handle product variants correctly
Many Shopify products come in variants — different sizes, colours, or configurations. By default, Shopify creates one product page that covers all variants. This is usually the right approach from an SEO perspective — one strong page for "Hilleberg Nallo 2 GT" is better than several thin pages for each colour option.
But there are cases where variants have enough search volume to warrant their own pages. "Women's hiking boots size 8" is a different search from "men's hiking boots" — and if you sell both, separate collection pages for each might make sense.
For most stores, the rule is simple: keep variants on one product page, and make sure your product description mentions the available variants naturally so Google understands the full range the page covers.
Avoid thin variant pages
If you have enabled separate URLs for variants in your theme — giving each colour or size its own URL — make sure each variant page has enough unique content to justify its existence. A variant page that shares 95% of its content with the main product page is duplicate content and will not rank independently. Use canonical tags to point variant URLs back to the main product page if the variants do not have enough unique content to stand alone.
Add and display product reviews
Product reviews do four things for your SEO and conversion rate simultaneously. They generate unique, keyword-rich content on your product pages that Google values. They provide the review data needed for star ratings in rich snippets. They build trust with shoppers who are on the fence. And they give you a steady stream of social proof that improves conversion rate over time.
The most important thing is to have a system for collecting reviews consistently. Set up an automated post-purchase email that asks customers for a review two weeks after their order arrives — when the product is fresh in their mind and they have had enough time to form an opinion.
Shopify has a free built-in product reviews app. For more features — photo reviews, Q&A, verified purchase badges — Judge.me and Okendo are the most widely used third-party options.
Make sure your review app outputs structured data in the correct format. Go back to the Rich Results Test after installing your review app and confirm that review ratings are included in your product schema. If they are not, check your app's settings for a "structured data" or "rich snippets" option.
Optimise your product page for conversion — not just rankings
An SEO strategy that drives traffic to product pages that do not convert is not a strategy — it is a traffic generation exercise. The goal is revenue, not visits. Here is what the highest-converting product pages have in common.
A clear, prominent call to action
Your Add to Cart button should be visible above the fold on every device without scrolling. It should be in a colour that contrasts with the rest of the page — not the same muted grey as every other button. Test the label too — "Add to Cart," "Buy Now," and "Get Yours" all convert differently depending on your store's tone and product category.
Trust signals near the buy button
The area around your Add to Cart button is the most valuable real estate on your product page. Use it to address the most common objections to buying:
Free delivery threshold or estimated delivery date
Return policy — how many days, how easy is the process
In-stock status — creates urgency and confirms availability
Payment options — showing accepted payment methods reduces cart abandonment
Security badge — especially important for first-time buyers
High-quality images from multiple angles
Shoppers cannot touch or try your products. Images are the closest substitute. Include at minimum: a clean product shot on white, a lifestyle image showing the product in use, a close-up of key details or materials, and — for apparel or gear — a scale reference showing size.
Use all available image slots in Shopify. More images give Google more content to index and give shoppers more confidence to buy.
An FAQ section at the bottom of the page
A short FAQ covering the four or five questions shoppers most commonly ask before buying does several things. It reduces pre-purchase support emails. It addresses objections that might otherwise prevent a sale. It adds keyword-rich content to the page. And it is eligible for FAQ structured data — which can produce expandable questions directly beneath your listing in search results.
Collection pages are the most underestimated pages on most Shopify stores. Store owners spend hours perfecting their product pages and homepage, then leave their collection pages as nothing but a title and a grid of products. That is a significant missed opportunity.
Collection pages sit at the commercial heart of your SEO strategy. They target the high-volume, buying-intent searches that happen before someone knows exactly which product they want — searches like "waterproof hiking boots," "camping tents," or "women's base layers." These are often the highest-traffic keywords in your niche, and a well-optimised collection page is your best chance of ranking for them.
Here is how to do it properly.
Start with the right keyword for each collection
Every collection page needs one clear primary keyword before you touch anything else. This should be the phrase real shoppers type into Google when they are browsing your product category — not an internal label you use to organise your store.
The distinction matters. You might call a collection "Men's Technical Outerwear" internally, but your customers search for "men's waterproof jackets." The keyword your customers use is the one your page needs to target.
How to find the right keyword
Start with Google autocomplete. Type your product category into the search bar and note every suggestion that appears. These are real searches people make — Google would not suggest them if nobody typed them.
Then look at the pages currently ranking for your target keyword. What words do they use in their titles and headings? How do they describe the category? This tells you how Google currently understands the topic and what language it expects to see on a page that ranks for it.
Finally, check Google Search Console. If your collection page already has any rankings, go to the Queries report, filter by the collection URL, and sort by impressions. You will often find keywords you are close to ranking for but have not actively optimised toward — these are your fastest wins.
For each collection, identify:
One primary keyword — the main phrase the page targets
Two to four secondary keywords — related phrases and natural variations
The search intent — are people browsing a category, or do they have a specific type in mind?
Write a strong title tag and meta description
Your title tag is the blue link shoppers see in Google search results. It is the most important on-page SEO element on your collection page. Most Shopify stores default to the collection name — which is almost never optimised for search.
A collection named "Tents" produces a title tag of "Tents | Your Store." That tells Google and shoppers almost nothing. A manually written title tag of "Camping Tents — Shop All Styles & Sizes | Your Store" tells them exactly what they will find, uses natural language, and includes the keyword without forcing it.
Rules for a strong collection title tag:
Include your primary keyword as close to the start as possible
Keep the whole thing under 60 characters — anything longer gets cut off
Add your store name at the end, separated by a dash or pipe
Write it for humans first — it needs to earn the click, not just include the keyword
Rules for a strong meta description:
Keep it under 155 characters
Include your primary keyword naturally — Google bolds it when it matches the search
Give the shopper a specific reason to click — mention range, free delivery, or a key benefit
Do not just restate the title — use the space to add something new
A weak meta description: "Browse our collection of camping tents."
A strong meta description: "Shop 60+ camping tents for every trip — lightweight backpacking shelters to spacious family tents. Free delivery on orders over $50."
To edit these fields in Shopify, go to your collection, scroll down to Search engine listing, and click Edit. Fill in both fields manually for every collection that matters to your business.
📝 Note
Text
Write a collection description — and make it count
This is the single most skipped optimization on Shopify stores, and it is one of the highest-impact ones. Most collection pages have no written content at all — just a headline and a grid of products. From Google's perspective, a page with no text is a page with no context, and a page with no context is very hard to rank.
Your collection description gives Google the content it needs to understand what the page is about, which keywords it should rank for, and who it is relevant to. It also helps shoppers who arrive on the page understand what they are looking at and how to choose.
How long should it be?
Two to four short paragraphs — around 150 to 250 words — is the right target for most collections. It does not need to be an essay. It needs to be useful.
What to cover:
What the collection contains and who it is for
What to look for when choosing — key features, specs, or considerations
What makes your range different or worth buying from you
Natural mentions of your primary keyword and related phrases
Write it the way you would explain the collection to a customer who has just walked into your shop. Specific, honest, and helpful.
Here is an example for a camping tents collection:
"Whether you are heading out for a weekend in the hills or planning a month-long expedition, the right tent makes all the difference. Our camping tents range covers every type of trip — from ultralight one-person shelters for fast-and-light backpacking to spacious four-season family tents built to handle serious weather.
Every tent in this collection has been chosen for its balance of weight, packability, and durability. If you are not sure where to start, look at the season rating first — a three-season tent covers most camping conditions, while a four-season tent is worth the extra weight if you camp in winter or at altitude.
Browse by type below, or use the filters to narrow by capacity, weight, or brand."
That is 130 words. It reads naturally, includes the primary keyword and several variations, answers a real question shoppers have before they buy, and ends with a clear navigational cue.
Where to place your description
Put a short introductory paragraph above the product grid, not below it. Most Shopify themes default to placing the collection description below the products, where most shoppers never scroll. A one to two sentence introduction above the grid gets read. Three paragraphs buried at the bottom largely does not.
Use the full description below the grid for the longer version — this is where Google reads it, and it does not disrupt the shopping experience.
Get your collection URL right
Shopify generates a URL handle automatically when you create a collection. Check every collection URL before it goes live and make sure it is:
Short and descriptive —
/collections/camping-tentsnot/collections/all-camping-tents-and-outdoor-sheltersLowercase with hyphens between words — never underscores
Free of unnecessary stop words like "the," "and," "for"
Matching your primary keyword as closely as possible without being forced
To edit a collection URL in Shopify, open the collection, scroll to Search engine listing, click Edit, and change the URL handle field.
The ideal URL tells both Google and a human what the page is about before they even visit it. /collections/waterproof-hiking-boots does that. /collections/collection-2 does not.
📝 Note
Text
Organise your products thoughtfully
The order your products appear in a collection is not just a UX decision — it is an SEO one. The products at the top of the page get the most crawl attention from Google and the most visual attention from shoppers. What you put first signals what the collection is primarily about.
Put your best-selling, best-reviewed, and most representative products at the top. These are the products that best define the collection and are most likely to convert a new visitor.
In Shopify, open a collection and use the Sort dropdown to choose a default order. For most collections, either "Best selling" or a manual custom order with your hero products at the top works well. Avoid "Alphabetically" — it prioritises products whose names start with letters near the beginning of the alphabet, which is rarely your best-converting lineup.
Keep your collections focused
Every product in a collection should genuinely belong there. Padding a collection with loosely related products to make it look larger dilutes the page's topical focus and sends a confusing signal to Google about what the collection is really about.
If you have products that fit into multiple categories, Shopify lets them appear in multiple collections without creating duplicate content issues — canonical tags handle this automatically. A tent that is both a backpacking tent and a family tent can appear in both collections. That is fine. What is not fine is adding it to a "climbing gear" collection just to fill it out.
Handle pagination correctly
If your collection has more products than fit on one page, Shopify uses pagination — adding ?page=2, ?page=3, and so on to the URL. These paginated pages should not compete with your main collection page for rankings.
Shopify handles this correctly by default. It adds a canonical tag on every paginated page pointing back to the first page, which tells Google that the first page is the authoritative version. You do not need to do anything manually unless your theme has been customised in a way that disrupts this.
To verify it is working, visit a paginated collection page — for example, /collections/tents?page=2 — right-click, and view the page source. Search for canonical in the code. You should see it pointing to /collections/tents without a page number. If it points to the paginated URL instead, the canonical tags need fixing.
Add structured data to your collection pages
Structured data on collection pages tells Google the key details about the products listed — prices, availability, and review ratings. When set up correctly, Google can display this information directly in search results as rich snippets, showing product images, prices, and stars beneath your collection listing.
Most Shopify themes include basic product structured data automatically. To check whether yours does, paste a collection URL into the Rich Results Test at search.google.com/test/rich-results. If errors come back, your theme may need updating or a structured data app.
For stores that want more complete structured data without touching code, Schema Plus for SEO and TinyIMG both handle this reliably from the Shopify App Store.
Build internal links to your collection pages
Your collection pages need other pages on your site pointing to them. Internal links pass authority — the more high-quality internal links a page has pointing to it, the more authority it accumulates, and the better it tends to rank.
Your navigation menu already links to your main collections, which gives them a strong authority signal. But you can reinforce this further through your blog content.
Every blog post you publish on a relevant topic should include at least one internal link back to the relevant collection page. A post on "how to choose a camping tent" should link to your Tents collection. A post on "best hiking boots for beginners" should link to your Hiking Boots collection. A buying guide comparing sleeping bag types should link to your Sleeping Bags collection.
These links do two things. They send authority signals to your collection pages. And they give readers a clear, natural next step — from reading about the topic to browsing the products — which improves the conversion path from your blog content.
A collection page SEO checklist
Work through this for every collection that matters to your store's revenue. Prioritise your highest-traffic and highest-converting collections first.A few final points as you work through your collections:
Prioritise by revenue potential, not alphabetical order
Start with the collections that generate the most revenue for your store. A fully optimised Tents collection that ranks on page one is worth far more than ten perfectly optimised collections for low-traffic categories.
One collection, one keyword
The most common structural mistake is creating two collections that target the same keyword — for example, "waterproof jackets" and "rain jackets" as separate collections. Google does not know which one to rank, so it may rank neither. Merge overlapping collections into one strong page rather than splitting authority across two weak ones.
Treat your collection descriptions as living content
Update them seasonally, add new buying guidance as your range expands, and refresh them when you spot keywords you are not yet ranking for. A collection description that was written once two years ago is missing opportunities that a regularly maintained one would capture.
An internal link is a hyperlink that points one page to another page on your website. It is one of the most important SEO practices for eCommerce websites.
As a part of Shopify SEO, here's why internal linking structure important:
it tells Google which pages on your Shopify store matter most
it helps with website navigation and distributing the page authority
it helps search engines discover and index pages
it helps understand the relationship between pages (product, category, blog, and other pages)
Internal links also help Google understand your site's structure. A well-linked site sends clear signals about which pages are most important, how different topics relate to each other, and which pages should rank for which searches.
Here is how to practice internal linking effectively in your Shopify store.
Step 1: Start with planning internal linking structure
A solid internal linking foundation begins with your site’s hierarchy and primary navigation tools, ensuring search engines can map your store’s structure.
As mentioned in the Chapter 2, you should organize pages, collections, products, and blog posts on your store in a way that it's not only help google but also your shoppers.
One recommended structure is pyramid, from top to down you structure your pages in a way that make sense, and no page is left out.
Google's John Mueller said that, "The top-down approach or pyramid structure helps us a lot more to understand the context of individual pages within the site."
Step 2: Build your linking strategy around topic clusters
The most effective internal linking structure for a Shopify store is topic cluster or siloing.
Each cluster or a silo has a central page usually a collection and a set of supporting pages that all link back to it.
Here is an example of how the links flow in a well-structured outdoor store:
Homepage → Tents collection (navigation link)
Tents collection → "How to choose a camping tent" blog post (contextual link in description)
"How to choose a camping tent" → Tents collection (contextual link in post)
"Best tents for backpacking" → Tents collection (contextual link in post)
"2-person vs 4-person tents" → Tents collection + specific product pages (contextual links)
Specific tent product pages → Tents collection (breadcrumb link)
Sleeping Bags collection → Tents collection (related collections link)
Every path leads back to the Tents collection page. Over time, that page accumulates authority from multiple sources — the homepage via navigation, blog posts via contextual links, product pages via breadcrumbs, and related collections via cross-links. This is why collection pages on well-structured stores consistently outrank those on poorly structured ones, even when the content is similar.
You can use Octopus sitemap generator to understand what your current site structure visually looks like.
Example:

Step 3: Use contextual internal links
Contextual links are links that you add within the body of your content. They carry high SEO value because they demonstrate the relationship and relevance between different topics.
Add links from blogs to products and collections
A well written blog posts have a huge potential to drive traffic, thus has high PA.
Beside they are top of funnel entry that can move traffic toward a purchase.
other that the practicing intenral linking, adding products and collection will help you with sales.
You can either use anchor texts to link to products or collections, or use apps like vevy.ai which will help you to add product or collections as blog post block, which will be visually more appealing:

Add links from collections to products
When you
In Shopify, Collections are custom, flexible groupings of products designed for front-end store navigation, marketing, and user experience (e.g., "Summer Sale," "New Arrivals"). Product Categories (or Taxonomy) are standardized, hierarchical classifications used for backend organization, tax calculation, and selling across external channels like Google Shopping.
Use descriptive anchor texts
Anchor text is the visible, clickable text of a link. It is one of the most important signals Google uses to understand what the linked page is about. Generic anchor text tells Google almost nothing. Descriptive anchor text tells it a great deal.
Compare these two ways of linking to your Tents collection from a blog post:
Weak: "Browse our full range here."
Strong: "Browse our full range of camping tents."
The second version tells Google that the linked page is about camping tents. Do this consistently across dozens of blog posts and product descriptions, and you are sending a clear, repeated signal that reinforces your collection page's relevance for that keyword.
A few rules for anchor text:
Use your target keyword or a close variation as the anchor text when linking to a collection or product page
Vary the phrasing slightly across different links to the same page — "camping tents," "tents for camping," and "our camping tents range" all reinforce the same page without looking mechanical
Never use the same exact anchor text in every link to the same page — exact-match repetition looks unnatural to Google
Avoid generic phrases like "click here," "read more," or "this page" — they waste the anchor text opportunity entirely
Audit your existing internal links
Before building new links, find out where your current linking structure is weak. There are two things to look for: orphan pages with no internal links, and important pages with very few.
Finding orphan pages
Run a Screaming Frog crawl of your store. In the results, filter for pages with zero inlinks — these are your orphan pages. Any product, collection, or blog post with no internal links pointing to it is essentially invisible to Google, regardless of how well it is optimised.
Fix orphan pages by identifying which existing pages should logically link to them. An orphaned blog post should be linked from at least one other post in the same cluster and from the relevant collection description. An orphaned product should be linked from its collection page and at least one related product.
Finding under-linked important pages
Use Google Search Console to identify your most important pages — the ones that target your highest-value keywords or generate the most revenue. Then check how many internal links point to each one using Screaming Frog or Ahrefs.
If a page that targets a high-value keyword has only two or three internal links pointing to it, it is under-linked relative to its importance. Add it to your navigation if it is not already there, link to it from every relevant blog post you publish, and add a contextual link to it from your most authoritative existing pages.
Avoid the most common internal linking mistakes
Linking with the same generic anchor text repeatedly
If every blog post links to your Tents collection with the anchor text "click here to shop tents," Google receives a weak, repetitive signal. Vary your anchor text naturally across different posts and pages.
Internal links buried at the bottom of pages
Links at the very bottom of a page, below the main content, carry less weight than links placed naturally within the body. If your only link to a collection page is in a footer widget, it is doing far less work than a contextual link within your first two paragraphs.
Too many links on one page
Spreading authority too thin by linking to twenty different pages from a single blog post dilutes the signal to each linked page. A post with three well-chosen, contextually relevant links is more powerful than a post with fifteen links to everything tangentially related. Aim for two to five meaningful internal links per piece of content.
Linking only downward
Most stores link downward: homepage → collections → products. But product pages and blog posts can also link back upward to collections and the homepage, and sideways to related content at the same level. A fully connected site links in all directions, spreading authority more evenly throughout the structure.
Not updating old posts with new links
Every time you publish a new collection page, product page, or blog post, there are almost certainly existing pages on your site that should link to it. Older blog posts that cover related topics, collection descriptions that mention the new product category, product pages for complementary items — all of these are missed linking opportunities if you only link to new content from the date of publication forward.
Build a habit of checking existing content for link opportunities whenever you publish something new. A quick search on your own site for posts covering a related topic will usually surface several pages that should link to the new one.
Let me say the quiet part out loud first: Google doesn't just rank pages anymore. It ranks sites that clearly know what they're talking about.
You can publish one decent post about camping tents and maybe, on a good day, rank for it. But a store that covers the entire topic (how to pick a tent, how to pitch one, what to buy for winter, brand comparisons, the beginner mistakes) becomes the source Google trusts for the whole category. Not one keyword but the category.
This is one of the biggest shifts in SEO of the last few years, and most Shopify stores are still writing like it's 2015. Individual keyword optimisation still matters, sure. But it works SO much better when the page lives inside a site Google already sees as an expert on the subject.
So here's how you actually build that.
Understand what topical authority actually means
Picture two outdoor stores.
Store A has 200 posts published over five years. One on tents, one on sunscreen, one on trail running, one on kayaking, one on camping recipes. There's no focus or connection between them. A bit of everything.
Store B has 60 posts, all about hiking and camping. They've covered tent selection from every angle, from the beginner guides, seasonal buying advice, brand comparisons, to setup tutorials and maintenance. And every post links back to their collection pages.
Who wins for "hiking and camping" searches? Store B. Almost every time. Even for individual posts that Store A also has.
Why? Because Store B has shown Google deep, consistent expertise → Store A has shown broad, shallow coverage of a bunch of unrelated stuff.
I always say this: Depth beats breadth. A focused strategy that covers one or two topics thoroughly will beat a scattered one that pokes at ten topics lightly.
Choose your core topics before you write anything
Your topical authority starts with a decision, not a keyword tool. Which topics do you actually want to own?
The answer comes from two places, and only two:
Your catalog → what do you actually sell?
Your customers → what do they research, worry about, and ask before, during, and after buying?
For most Shopify stores, the right number is 3 to 5 core topics - topical maps. Each one should map to a real collection page on your store. Sell outdoor gear? Maybe hiking, camping, climbing, trail running. Sell kitchen stuff? Home baking, coffee brewing, meal prep.
Most of the time, it's better to resist the urge to write about topics that have nothing to do with what you sell. Every off-topic post is a little signal to Google saying "this site isn't really focused on anything." You're not building authority there, you're diluting it.
Build topic clusters around each core topic
Once you've got your core topics, you plan a cluster around each one.
A topic cluster is just a group of related posts that all cover different angles of the same broad subject → and all link back to a central collection (or pillar) page on your store.
It works on two levels, and this is the part people miss:
For readers → someone lands on any post in your camping cluster and can follow links to every related thing they care about, all on your site. They don't leave to find the rest.
For Google → you've built a dense web of topically related pages that together scream "we know this subject."
Every cluster needs three ingredients:
A pillar page. This is your collection page.
/collections/camping-tentsis the pillar. It targets the broad, high-volume keyword, and every post in the cluster points back to it.Supporting posts. The blog posts covering specific slices of the topic. Each targets a more specific keyword, serves a different searcher, and links back to the pillar.
Internal links. Every post links to the pillar, and ideally to at least one other post in the cluster. This is the web. This is what actually signals authority.
Over time, that collection page soaks up authority from every post in the cluster → and Google slowly starts associating your store with the whole topic, not just the pages you optimized.
Match your content to buyer intent
Not every blog post does the same job. And if you treat them like they do, you'll be confused about why your "traffic" isn't buying product from your store.
Here's the thing you should care about more than rankings: intent. An awareness post pulls a big crowd that converts at a low rate. A decision-stage post pulls a smaller crowd that converts 5–10x higher. You need all three types but you have to know which is which, and track them differently.
Awareness posts target broad, informational searches. The reader has a problem or a curiosity but isn't shopping yet. "Where to go hiking in Norway." "How to stay warm camping in winter." These build your audience and make your store a trusted name → they rarely sell today. Their value is long-term. That's fine, as long as you know that's the job they're doing.
Comparison posts target people weighing options. "Hiking boots vs trail runners." "Down vs synthetic insulation." "Best tents for beginners." These readers are warmer. A genuine comparison post with real recommendations that link naturally to your products converts meaningfully better than awareness content.
Decision posts target people who are basically ready and just want confirmation. "Best waterproof hiking boots 2025." "Hilleberg Nallo 2 GT review." "Top 10 camping tents." These convert best because the intent is commercial. The readers want a recommendation. So give them one clearly and confidently, and embed related products to your blog posts so they can add to their cart effortlessly. vevy.ai allows you to embed e-commerce blocks to your block post with a rich drag-and-drop blog builder.
Plan your clusters systematically
Planning a topic cluster is about systematically mapping every question a potential customer might ask across the entire buying journey, and then assigning each question to a post.
Here is a practical process for planning a full cluster:
Step 1 — Start with your collection page keyword
Take your collection page's primary keyword, for example, "camping tents" and use it as the seed for everything that follows.
Step 2 — Generate questions at each buyer stage
For each stage, ask: what would someone search for if they were at this point in their journey and interested in this product category? Write down every question you can think of. Ten to fifteen per cluster is a good starting point.
Step 3 — Validate each question with search data
Check each question in Google autocomplete or a keyword research tool to confirm real people are searching for it. Discard questions with no search volume. Keep the ones with clear demand.
Step 4 — Assign one post per question
Each question becomes one blog post. One question, one post, one target keyword. Do not try to answer multiple different questions (queries) in one post becuase it splits your keyword focus and makes the post harder to rank.
Step 5 — Map your internal links before you write
Before writing a single word, decide which pages each post will link to. Every post links to the pillar collection page. Most posts link to at least one other post in the cluster. Decision-stage posts link to specific product pages.
Write content that genuinely covers the topic
Google's Helpful Content guidelines are explicit: content written primarily to rank in search engines, rather than to genuinely help people, is penalised. The stores that build lasting topical authority are the ones whose content is actually the most useful answer to the question being asked.
This means your posts need to go beyond surface-level coverage. A post on "how to choose a camping tent" that covers only season ratings and capacity is not a complete answer to that question. A post that also covers pole types, weight, packability, waterproofing ratings, setup time, and how to match tent choice to trip type is a genuinely useful resource. And, this type of posts are the one that Google will rank over shallow competitors.
A few principles that separate genuinely helpful content from filler:
Answer the question completely, not partially
If someone searches "how to choose a camping tent," they want to know everything relevant to making that decision. Cover every factor that matters, even if it makes the post longer than you initially planned.
Include specific, concrete examples
Vague advice like "choose a tent with good waterproofing" is not helpful. Specific advice like "look for a hydrostatic head rating of at least 2000mm for UK conditions, and 3000mm+ if you camp in exposed mountain environments" is genuinely useful and demonstrates real expertise.
Show your store's perspective, not just generic information
Your content should reflect the actual experience and product knowledge of someone who works with these products every day. What do your customers ask most often? What mistakes do beginners make? What does your most experienced staff member know that a first-time buyer does not? This is the content that builds genuine authority.
Update posts regularly
A post written two years ago may now contain outdated product recommendations, old prices, or superseded advice. Outdated content is a topical authority signal working against you. Review and update your most important cluster posts at least once a year.
Use vevy.ai to build your content engine
Planning and executing a full topic cluster strategy manually is time-consuming. Researching keywords, mapping buyer stages, writing posts, adding product blocks, and tracking which posts generate revenue requires significant coordination across multiple tools.
Vevy.ai is built to handle this for Shopify stores specifically. Here is how each part of the platform supports topical authority:
Cluster planning — Vevy.ai generates a complete content plan for your store's niche, organised into topic clusters with posts mapped to awareness, comparison, and decision stages. Instead of starting from scratch, you start with a full strategic map of what to write and why.
AI-assisted writing — once your cluster is planned, Vevy.ai's writing tool helps you draft each post with the right structure, keyword usage, and internal linking in place from the start. Posts are written with your products in mind, not just the topic in general.
Conversion-focused content blocks — every post you build in Vevy.ai's editor can include 40+ inline content blocks — product showcases, collection grids, comparison tables, FAQs, CTAs — placed exactly where they will drive the most clicks based on engagement data from other posts.
Revenue attribution per post — once posts are live, Vevy.ai's analytics show you which posts in each cluster are generating the most revenue, where readers are dropping off, and which content blocks are driving the most product clicks. This closes the feedback loop between your content strategy and your store's growth.
The result is a content operation where every post has a clear purpose, every cluster is built around a collection that matters to your business, and every piece of content is tracked for revenue impact — not just traffic.
Measure topical authority progress
Topical authority is not a metric you can track directly. But you can see its effects clearly in your data if you know what to look for.
Increasing impressions across a topic area
In Google Search Console, go to the Performance report and filter by a topic-related keyword. For example, filter queries containing "camping tent." Watch the total impressions for that filter over time. As your topical authority grows, you will appear for more and more queries in the category, including ones you have not specifically targeted with individual posts.
Rankings lifting across the whole cluster
When topical authority is working, you will notice that your entire cluster improves together rather than individual posts improving in isolation. A new post in a strong cluster often ranks faster than a post in a weak or absent cluster, because the new post benefits from the authority the cluster has already built.
Your collection page rankings improve as the cluster grows
This is the clearest signal of all. Your Tents collection page should rank higher for "camping tents" after publishing five cluster posts than it did before. Each post in the cluster passes authority back to the collection page and they signal to Google that your store is the authoritative source on the topic.
Structured data is one of those SEO tactics that most store owners have heard of but never actually set up. That is a significant missed opportunity. When implemented correctly, it is the difference between a plain blue link in Google search results and a rich listing showing your product's price, star rating, and availability — before someone even clicks through to your store.
It also matters beyond traditional search. As AI-powered features like Google's AI Overviews become a larger part of how shoppers discover products, structured data is increasingly how these systems understand and accurately represent what you sell.
Here is everything you need to know.
What is structured data?
Every page on your Shopify store looks a certain way to human visitors — images, headings, prices, reviews. But Google's crawlers do not see your page the way a person does. They read the underlying HTML code, and without explicit signals, they have to guess what each piece of information means.
Structured data removes the guesswork. It is a standardised way of labelling your page content so Google understands not just that there is a number on the page, but that the number is a price. Not just that there is some text, but that it is a product name. Not just that there is a star graphic, but that it represents an average rating from 847 reviews.
The most widely used structured data format is called JSON-LD — a small block of code added to your page that describes its content in a language Google reads fluently. You do not see it when you visit the page. Google does.
Why structured data matters for Shopify stores specifically
For e-commerce stores, structured data unlocks a specific type of search result enhancement called a rich snippet. Rich snippets for products can include:
Star ratings and review counts beneath your listing
Current price and currency
Availability status — in stock, out of stock, pre-order
Price drop indicators when your price decreases
Shipping information and estimated delivery dates
Return policy details
A search result with star ratings, a price, and an in-stock badge stands out dramatically from a plain text listing. Click-through rates on rich snippets consistently run 20 to 30 percent higher than equivalent plain listings. For a collection page ranking on page one, that difference compounds into significant additional revenue over time.
What Shopify does automatically — and what it does not
Most Shopify themes include basic product structured data out of the box. When you install a standard theme like Dawn, it outputs a Product schema type with your product name, description, and image. This is enough to make Google aware that the page is a product page.
But basic is not enough for rich snippets. To qualify for star ratings, prices, and availability in search results, your structured data needs to include specific fields that many themes either miss entirely or implement incorrectly.
The most commonly missing fields in default Shopify structured data are:
aggregateRating— the review data needed for star ratings to appearoffers— the price, currency, and availability fields needed for price snippetsbrand— the brand name associated with the productskuormpn— product identifiers that help Google match your listing to its product knowledge graphshippingDetails— delivery information that can appear in search results
hasMerchantReturnPolicy — return policy data that adds a trust signal to your listing
To find out exactly what your store currently outputs, paste any product URL into the Rich Results Test at search.google.com/test/rich-results. The tool will show you which schema types are present, which fields are populated, and which errors or warnings are preventing your pages from qualifying for rich snippets.
How to fix or implement product structured data
There are three approaches, depending on your comfort with code and your store's setup.
Option 1 — Update your theme's structured data directly
If you are comfortable with Liquid code and your theme already outputs product structured data, you can edit the existing schema block to add the missing fields.
In your Shopify admin, go to Online Store → Themes → Edit code. Search your theme files for application/ld+json — this is the tag that marks a JSON-LD structured data block. You will typically find it in your product.liquid or main-product.liquid file.
Here is what a complete, rich-snippet-eligible product structured data block looks like:
Replace any existing JSON-LD block in your product template with this, or add the missing fields to your existing block. After saving, validate the output using the Rich Results Test.
Option 2 — Use a structured data app
If you are not comfortable editing theme code, a dedicated structured data app is the safest and most reliable option. These apps inject complete, up-to-date schema markup without touching your theme files — which means they keep working correctly even when you update your theme.
The most reliable options for Shopify:
Schema Plus for SEO — the most comprehensive structured data app available for Shopify. It handles product schema, breadcrumb schema, FAQ schema, organisation schema, and more. It stays updated as Google's structured data requirements evolve and includes a built-in validation tool so you can check your markup without leaving Shopify.
TinyIMG — primarily an image optimisation tool, but includes solid product structured data as part of its broader SEO feature set. A good option if you are already using it for image compression.
JSON-LD for SEO — a dedicated structured data app with strong reviews and a straightforward setup. Handles the core product schema fields reliably.
For most stores, Schema Plus for SEO is the strongest choice if structured data is your primary concern. TinyIMG is a better choice if you want a single app covering both speed and schema.
Option 3 — Upgrade to a theme with better structured data
If your theme is several years old or is a heavily customised legacy theme, the cleanest long-term solution is migrating to a Shopify 2.0 theme with properly implemented structured data built in.
Shopify's free Dawn theme outputs solid product structured data by default and is regularly updated as Google's requirements change. Most premium themes built on Shopify 2.0 — including Impulse, Prestige, and Turbo — also include well-implemented product schema.
This option requires the most upfront work but eliminates structured data maintenance as an ongoing concern.
Add review structured data — it is not automatic
Star ratings in search results are one of the most visible benefits of structured data, and they directly drive higher click-through rates. But they do not appear automatically just because you have a reviews app installed.
For star ratings to show in search results, two things must be true simultaneously. Your review app must store rating data in Shopify metafields in the correct format. And your product structured data must include an aggregateRating field that pulls from those metafields.
Most store owners have the first part — a reviews app collecting data — but not the second part. The structured data block on their product pages either does not include aggregateRating at all, or pulls from the wrong metafield.
How to set it up correctly
First, confirm that your review app supports Shopify metafields for ratings. In your Shopify admin, go to Settings → Custom data → Products. If your review app is set up correctly, you will see metafields for rating value and rating count — typically named something like reviews.rating and reviews.rating_count.
Then confirm that your structured data includes an aggregateRating block that references these metafields. If you are using a structured data app, check its settings for a "reviews integration" or "rating data" option. If you are editing your theme code directly, add the aggregateRating block as shown in the code example above.
After making changes, validate with the Rich Results Test. The tool will show you a preview of how your product listing could appear in search results — including the star rating display if everything is set up correctly.
Add FAQ structured data to product pages
FAQ structured data is a separate schema type from product schema, and it is underused on most Shopify product pages. When implemented correctly, it can produce expandable question-and-answer sections directly beneath your search listing — dramatically increasing the amount of space your result occupies on the page and improving click-through rate.
For product pages, the most valuable FAQ questions to mark up are the ones shoppers ask most commonly before buying — questions about compatibility, sizing, materials, care instructions, and return policy.
Here is what FAQ structured data looks like:
Only mark up questions that have actual answers visible on the page — Google requires that the questions and answers in your structured data match what a visitor can read on the page itself.
The easiest way to add this without code is through Schema Plus for SEO, which includes a FAQ schema builder. You can add questions and answers through a simple interface and it handles the markup automatically.
Add breadcrumb structured data
Breadcrumb structured data is simpler than product schema but consistently valuable. It tells Google the hierarchical path to your page — Home → Camping → Tents → Hilleberg Nallo 2 GT — and can display that path as navigational links directly in your search result, replacing the plain URL.
Most Shopify 2.0 themes include breadcrumb structured data automatically alongside the visual breadcrumb trail. To check whether yours does, paste a product URL into the Rich Results Test and look for a BreadcrumbList schema type in the results.
If your theme outputs breadcrumbs visually but not in structured data, a structured data app will add the markup automatically.
Validate and monitor your structured data
Implementing structured data is not a one-time task. Google's requirements evolve, theme updates can break existing markup, and app updates can change how data is output. Build a habit of checking your structured data at least once a quarter.
Rich Results Test (search.google.com/test/rich-results)
The most direct validation tool. Paste any URL to see which schema types are present, which fields are populated, and which errors or warnings would prevent rich snippets. Always test your product template, your collection pages, and your homepage separately.
Schema Markup Validator (validator.schema.org)
A more technical alternative to the Rich Results Test. It checks your markup against the full schema.org specification rather than just Google's rich result requirements. Useful for catching issues the Rich Results Test might miss.
Google Search Console — Enhancements report
Go to GSC → Enhancements to see all structured data types Google has detected across your entire site. Each type has its own report showing valid pages, pages with warnings, and pages with errors. This is the only place where you can see structured data status at scale — across all your product pages simultaneously rather than one page at a time.
If a new error appears in the Enhancements report, Google will also send a notification to your GSC account — which is why keeping GSC set up and monitored is essential.
Backlinks are still important ranking factor in SEO.
For most Shopify store owners it may be hard to earn backlinks for each page, since you may have hundreds or thousands of products pages, and earning backlinks for each almost seem impossible.
Though it's hard, it's not that impossible. We understand that backlink acquisition requres dedicated person and time resource to be successful. Though it's not widely practiced in ecommerce sphere, still there are some creative ways to do so.
For products and collection pages you may need PR and a special campaigns. will sbe shown in this section.
Here is how to do it in a way that is sustainable, effective, and appropriate for an independent Shopify store.
https://marketingexamples.com/seo/digital-pr
Understand what makes a backlink valuable
Not all backlinks are equal. A single link from a respected industry publication is worth more than a hundred links from low-quality directories. Before you start building links, it helps to understand what Google actually values.
Relevance — a link from a site covering the same topic as your store is far more valuable than a link from an unrelated site. A link to your camping gear store from an outdoor adventure blog is a strong signal. The same link from a finance website means almost nothing.
Authority — links from established, trusted sites carry more weight than links from new or low-traffic ones. A link from a major outdoor publication, a respected gear reviewer, or a well-known hiking community carries significantly more authority than a link from a directory nobody reads.
Placement — a link embedded naturally in the body of an article carries more weight than one buried in a footer or sidebar. Google treats contextual links — ones that appear within relevant written content — as stronger endorsements than structural links placed in templates.
Uniqueness — a link your competitors do not have is more valuable than one they all share. Directory links and press release links are often low value because every store in your niche can get them with minimal effort.
Start with links you already deserve
Before pursuing new backlinks, check the links you should already have but might be missing. These are the easiest backlinks to earn because someone already has a reason to link to you.
Supplier and brand links
If you are an authorised retailer for specific brands, many of those brands maintain a "where to buy" or "authorised retailers" page on their own website. A link from a brand's official site is high quality and directly relevant. Contact your suppliers and ask whether they list authorised retailers and whether they can add your store.
Industry associations and memberships
If your business is a member of any trade association, outdoor club, business network, or industry body, check whether they have a member directory with links. These are easy, credible, and often forgotten.
Local business directories
If you have a physical presence or serve a specific geographic area, local business directories — including Google Business Profile, Bing Places, and reputable local directories — provide low-effort links alongside local SEO benefits. Consistency matters here: use the exact same business name, address, and phone number across every listing.
Previous press coverage
If your store or products have ever been mentioned in articles, blog posts, or reviews without a link, those are unlinked mentions — and they are recoverable. Use Google to search for your brand name and filter results to exclude your own domain. Any mention of your store that does not include a link to it is a link you can politely request.
How to earn backlinks?
Create content that earns links naturally
The most sustainable source of backlinks for any Shopify store is content that other sites genuinely want to reference. This does not mean publishing more blog posts, it means publishing specific types of content that people find it so valuable that they wan to mention, refer to your post.
Engage in guest blogging
find websites in your niche that
Free tools and calculators
A useful free tool earns links naturally because it provides value that text alone cannot. A tent weight calculator for hikers who are weight-conscious, a sleeping bag temperature rating guide for different climates, a gear checklist generator for different trip types — these are practical tools that outdoor blogs, hiking forums, and review sites will link to because their audiences find them useful.
Building a simple interactive tool requires developer time but can earn links consistently for years after publication.
Product comparisons and test results
If you sell technical products, publishing genuine comparative test results — real measurements, honest assessments, clear methodology — gives other sites something credible to reference. An outdoor gear store that publishes waterproofing test results for the jackets they sell, or weight measurements they took themselves, earns links from reviewers and forums that trust the data.
Pursue editorial links through outreach
Once you have content worth linking to, you can actively reach out to relevant sites and ask them to link to it. Done well, this is legitimate and effective. Done poorly, it is spam.
The difference is relevance and personalisation. A mass email sent to 500 websites asking them to link to your homepage is spam. A personalised email to a specific writer at an outdoor publication, referencing an article they wrote, explaining why your research or guide would add value to their readers — that is outreach.
How to find the right sites to approach
Search Google for content that is already covering your topic. A search like "best camping tents guide" or "how to choose a hiking boot" will show you which sites are already writing about your category. These are sites whose audiences are interested in what you sell, which means a link from them is both relevant and likely to drive traffic.
Look for blogs, review sites, online magazines, and community sites — not direct competitors. A site that publishes gear reviews and buying guides is a potential link partner. Another Shopify store selling the same products is not.
How to write an outreach email that gets a response
Keep it short, specific, and focused on their readers — not your store. A template that works:
Subject: Quick note on your tent buying guide
Hi [Name],
I came across your camping tent guide while researching [specific topic] — really clear breakdown of season ratings, which most guides gloss over.
We recently published [specific piece of content] based on survey data from 400 hikers. I thought it might be worth adding as a reference for the section on [specific section] — it covers [specific relevant angle] that your readers might find useful.
Happy to share the full data if it would help.
[Your name]
Notice what this does. It names the specific article. It mentions a specific detail that shows you actually read it. It focuses entirely on value for their readers. It does not ask for anything directly — it offers something.
A response rate of five to ten percent on cold outreach is realistic and worth pursuing. Send it to the right people with the right content and it can be meaningfully higher.
Get coverage in product roundups and gift guides
Many publications publish regular product roundups — "the best hiking boots of 2025," "top camping gear gifts," "our favourite outdoor products this season." Getting your products included in these roundups is one of the most direct ways to earn high-quality backlinks while also driving referral traffic from readers who are actively looking to buy.
How to get included
Most roundup articles are written by journalists or editors who either use products themselves or reach out to brands for product samples. The process varies by publication, but the approach is similar across the board.
Start by identifying publications that publish roundups in your category. Search Google for "[your product category] best [current year]" and note which sites consistently appear. These are the publications to approach.
Then contact the editor or writer responsible for that content. Explain what you sell, why your products are relevant to their audience, and offer to send a sample for review. Many publications have editorial guidelines for product submissions — look for a "contact us" or "press" page on their site.
A genuine product review in an authoritative publication — with a link to your store — is worth far more than most other link-building activities you could spend the same time on.
Digital PR — earn links at scale
Digital PR is the most ambitious approach to link building for a Shopify store. Done well, it earns links from major publications that would be impossible to get through standard outreach. Done poorly, it is expensive and produces nothing.
The core idea is simple: create a story, a data set, or a campaign that is newsworthy enough for journalists to cover without you paying for it. The link comes as a byproduct of the coverage.
Types of campaigns that earn PR links
Stories rooted in data tend to travel furthest. "We surveyed 500 UK hikers about their gear habits and found that 62% have never replaced their walking boots despite wearing them for more than five years" is a story with a specific angle that a journalist can write. It is tied to your product category, it gives you a reason to exist in the coverage, and the link comes naturally.
Charitable campaigns, sustainability initiatives, and community projects also attract coverage if they are genuine and meaningful. A campaign where you plant a tree for every tent sold, or a partnership with a hiking conservation charity, is a story with a human angle that regional and national press genuinely covers.
The investment is higher than other link-building approaches — you need good data or a genuine initiative, and ideally a PR contact or agency to help place the story. But the payoff — a link from a national newspaper or major industry publication — can move your domain authority meaningfully in a way that dozens of smaller links cannot.
Engage genuinely with communities and forums
Outdoor forums, Reddit communities, Facebook groups, and niche online communities are where your potential customers spend time. Participating genuinely in these spaces — answering questions, sharing knowledge, contributing to discussions — builds brand awareness and occasionally earns links when community members reference your content or products.
The key word is genuinely. Joining a hiking forum only to drop links to your store is spam and it damages your reputation. Joining a hiking forum because your store is run by people who are genuinely passionate about hiking, and participating as a knowledgeable member of that community, builds the kind of trust that eventually produces links, referrals, and loyal customers.
When your store publishes a genuinely useful resource — a comprehensive guide, original research, a free tool — sharing it in a relevant community where it adds value is legitimate and effective. The distinction is always: am I contributing something useful, or am I just advertising?
Build links through partnerships and collaborations
Partnerships with complementary businesses in adjacent niches are an underused source of high-quality backlinks. A camping gear store can partner with a hiking route planning service, a travel blogger who covers outdoor adventures, a photography community that shoots landscapes, or a conservation charity.
These partnerships take many forms. You might write a guest post for their audience. They might feature your products in a roundup. You might co-create a resource — a guide to photographing landscapes that naturally includes gear recommendations. You might sponsor an event or a podcast that covers adjacent territory.
Every genuine partnership creates natural link opportunities — because both parties benefit from referencing each other to their respective audiences.
Monitor your backlink profile and protect it
Building backlinks is only half the job. The other half is monitoring what you have and protecting it.
Track your existing backlinks
Use Google Search Console → Links → Top linking sites to see which sites currently link to your store. Check this monthly. If a significant link disappears — a major publication removes an article that linked to you, for example — it is sometimes worth reaching out to ask if it can be restored or redirected.
For more detailed backlink data, Ahrefs and Semrush both provide comprehensive backlink profiles, including new links gained, links lost, and the authority of every linking domain. Either tool is worth the investment once you are actively pursuing link building.
Disavow toxic links
Occasionally, low-quality or spammy sites will link to your store without your knowledge. This is usually harmless — Google ignores most spammy links. But if you notice a sudden influx of links from clearly manipulative sources, or if you receive a manual action notification in GSC related to unnatural links, you can submit a disavow file through Google Search Console to tell Google to ignore specific links.
This is a tool for rare, serious situations — not a routine practice. Most stores never need to use it.
Conversion SEO is where your rankings start paying for themselves. Most SEO guides stop at getting traffic to your store. This one goes further — because a page that ranks on page one but fails to convert is generating costs, not revenue.
Conversion SEO is the practice of optimising your pages so that the visitors SEO sends you actually buy. It sits at the intersection of search optimisation and conversion rate optimisation — and the two are more connected than most people realise. Google measures how searchers interact with your pages. When visitors arrive and immediately leave, that is a signal that your page did not satisfy the search. When they arrive, stay, and engage, that is a signal that it did. Better conversion behaviour reinforces your rankings. Better rankings send more relevant traffic. The two compounds.
Here is how to optimize every layer of the conversion journey.
Match search intent precisely
The single most important conversion SEO decision you make is whether your page matches what the searcher actually wanted. A page that ranks for a keyword but does not match the intent behind it will always have a poor conversion rate — because the visitor arrived expecting something different from what they found.
Search intent falls into four types. Informational intent means the person wants to learn something. Navigational intent means they are looking for a specific site. Commercial intent means they are researching before buying. Transactional intent means they are ready to buy right now.
Your product and collection pages should rank for commercial and transactional searches. Your blog posts should rank for informational and commercial searches. Mixing these up is one of the most common and costly SEO mistakes a Shopify store can make.
A product page ranking for "how to choose a camping tent" will have a terrible conversion rate — because the searcher wanted a guide, not a product listing. A blog post ranking for "buy Hilleberg Nallo 2 GT" will also convert poorly — because the searcher was ready to purchase and found an article instead.
How to check your intent match?
Go to Google Search Console → Performance → Search results. Filter by a specific page URL. Look at the queries that page ranks for. If your product page is appearing for informational queries — "how to," "what is," "guide to" — your page is not matching the intent of the searches bringing it traffic. Either the content needs adjusting or you need a separate informational piece targeting those queries instead.
Optimise your title tags and meta descriptions for clicks
Your title tag and meta description are your store's first conversion opportunity — before anyone has even visited your page. They are the copy that convinces a searcher to click your result instead of the four others on the page.
Most Shopify stores treat title tags as an SEO technical task and meta descriptions as an afterthought. The stores that convert best treat both as copywriting opportunities.
How to write title tags that earn clicks?
A title tag that ranks well but earns few clicks is costing you revenue. Your click-through rate from search results is both a conversion metric and an indirect ranking signal — Google notices when searchers consistently choose other results over yours.
The highest-converting title tags do three things. They match the keyword precisely so the searcher knows the page is relevant. They include a specific benefit or differentiator that gives a reason to click. And they create just enough curiosity or urgency to make clicking feel worth it.
Compare these two title tags for a camping tents collection:
Weak: Camping Tents | Your Store
Strong: Camping Tents — 60+ Styles, Free Delivery | Your Store
The second version tells the searcher something specific and valuable before they click. It answers the implicit question every searcher has: "Is this worth my time?"
For product pages, including the brand, model, and a key specification in the title tag gives buyers the confirmation they need:
Hilleberg Nallo 2 GT — 1.8kg 4-Season Backpacking Tent | Your Store
Meta descriptions that sell the click
Meta descriptions do not directly affect rankings. They directly affect click-through rate — which affects how many people your ranked pages actually send to your store.
Write every meta description as if it is an advertisement for the click. Include your primary keyword — Google bolds it in results when it matches the search. Lead with a specific benefit, not a generic description. End with a soft call to action or a detail that removes a common objection — free returns, in-stock now, next-day delivery.
A weak meta description: Browse our range of camping tents suitable for all types of outdoor trips.
A strong meta description: Shop 60+ camping tents — lightweight backpacking shelters to 4-season family tents. Free delivery on orders over $50. In stock now.
The strong version is specific, benefit-led, and answers the two questions every buyer has before clicking: "Do they have what I need?" and "Is buying here worth it?"
Build trust at every stage of the buying journey
Trust is the most underestimated conversion lever in e-commerce. A shopper who does not trust your store will not buy from you regardless of how well your product page is optimised. And trust is not built in one place — it is accumulated across every touchpoint in the buying journey.
Trust signals on your product pages
The area immediately surrounding your Add to Cart button is the most valuable real estate on your product page. Use it to address the most common objections to buying from an unfamiliar store.
Delivery information should be specific and reassuring — not vague. "Free delivery on orders over $50 — estimated arrival 2 to 4 days" converts better than "shipping available." A clear returns policy next to the buy button removes one of the biggest barriers to purchase. In-stock status creates appropriate urgency and confirms availability. Payment method icons — especially recognisable ones like PayPal, Apple Pay, and major card logos — signal that your checkout is safe and familiar.
Social proof throughout the page
Product reviews are the most powerful trust signal available to an e-commerce store. Shoppers trust other shoppers more than they trust store copy. A product with 47 reviews averaging 4.6 stars converts at a dramatically higher rate than an identical product with no reviews.
Display your review count and average rating prominently — near the product title, not buried at the bottom of the page. Make sure your review app outputs the structured data needed for star ratings to appear in search results. And actively collect reviews by sending a post-purchase email two weeks after delivery — when the product is fresh in the customer's mind and they have had enough time to form an honest opinion.
Store-level trust signals
First-time visitors need more reassurance than returning customers. Make sure your store communicates credibility before they reach the product page. A clear About page that explains who you are and why you care about your niche. A visible contact email or phone number — ideally in the header on mobile. Security badges near the checkout. A returns policy that is easy to find and easy to understand.
These signals individually seem minor. Together they determine whether a first-time visitor decides your store is worth trusting.
Optimise your page experience signals
Google's page experience signals — Core Web Vitals, mobile usability, HTTPS — are ranking factors. But they are also conversion factors. A page that is slow to load, difficult to navigate on mobile, or visually unstable as it renders does not just rank lower. It converts at a lower rate because frustrated visitors leave before they buy.
Mobile experience is the conversion priority
More than half of all e-commerce traffic comes from mobile devices. But mobile conversion rates consistently lag desktop conversion rates on most stores — not because mobile shoppers are less likely to buy, but because most stores have a worse experience on mobile than on desktop.
Check your store on your actual mobile phone — not in browser developer tools. Navigate from a Google search result to a product page and attempt to add something to your cart. Note every moment of friction. Text that is too small to read without zooming. Buttons too small to tap accurately. Images that take too long to load on a mobile connection. A checkout process that requires too many steps.
Each of these friction points is a place where a buyer gives up. Eliminating them improves both your mobile conversion rate and your Core Web Vitals scores simultaneously.
Page speed directly affects conversion rate
Research consistently shows that every additional second of load time reduces conversion rate. A store that loads in one second converts at roughly twice the rate of a store that loads in three seconds for the same traffic.
The steps covered in the page speed and Core Web Vitals chapter — compressing images, removing unused apps, preloading your LCP image — improve your rankings. They also improve your conversion rate. The two benefits compound.
Convert your blog traffic — not just your product pages
Most stores treat their blog as a traffic channel and their product pages as a conversion channel. The most effective stores treat their blog as a conversion channel too.
A reader who arrives on a blog post from an organic search is not a dead end. They are a potential customer who has demonstrated interest in your product category. The question is whether your blog is set up to convert that interest into a purchase — or whether it lets the reader leave without ever seeing your products.
Match conversion elements to buyer stage
Not all blog readers are ready to buy. A reader on an awareness-stage post — "best places to hike in Norway" — is early in their journey. Hard-selling them a product will not work and may feel jarring. A reader on a decision-stage post — "best camping tents 2025" — is close to buying. Not making it easy for them to click through to your store is a missed conversion.
Design your conversion elements to match the stage of the post. Awareness posts should include soft contextual links — "if you are planning a camping trip, our tent range covers everything from lightweight solo shelters to family-sized options." Decision posts should include prominent product showcases — actual products with images, prices, and a direct link to the product page — positioned at the point where the reader has just been persuaded by your recommendation.
Use Vevy.ai's content blocks to convert blog readers
This is exactly the gap Vevy.ai is built to close. Standard blog editors treat a post as a document — text, headings, and maybe an image. Vevy.ai's editor treats a post as a conversion page, giving you 40+ inline content blocks you can place anywhere in the post.
Product showcase blocks pull live product data — image, price, availability — and embed them directly into the post at the point of highest reader intent. A decision-stage post recommending your top three camping tents can include actual product cards for each tent, with prices and an Add to Cart path, exactly where the reader is most persuaded.
Collection blocks embed a curated grid of products from a specific collection — giving readers who are browsing rather than ready for a specific recommendation a visual entry point into your store.
CTA blocks with specific, benefit-led copy — "Find your tent for this summer" rather than generic "Shop now" — convert at higher rates than generic calls to action because they feel like a natural next step rather than an advertisement.
Use engagement data to improve conversion
Vevy.ai's paragraph engagement analytics show you the read-completion rate for every section of every blog post. This data is directly actionable for conversion optimisation. If 85% of readers reach your product recommendations section but only 30% reach your conclusion, you know two things: the recommendations section is your conversion hotspot, and everything after it is largely unread.
The implication is clear. Move your strongest call to action and product showcase into the top half of the post — before the point where most readers stop. Do not bury your best conversion content at the bottom where most visitors never arrive.
The heatmap data tells you which content blocks actually get clicked. If product showcase blocks drive 41% of all post clicks and CTA buttons drive 22%, you have a clear, data-backed case for including both in every decision-stage post — and placing them earlier, where more readers will see them.
Optimise your collection pages for browsing conversion
Collection pages are where shoppers browse before they buy. A well-optimised collection page does not just rank — it actively guides browsers toward a purchase decision.
Filtering and sorting that works
Shoppers who use your collection filters are significantly more likely to buy than those who do not. Filtering signals active purchase intent — the shopper is narrowing down to exactly what they want.
Make sure your collection filters are intuitive, mobile-friendly, and cover the dimensions your shoppers actually care about. For a tent collection that might be season rating, capacity, weight, and brand. For a boots collection it might be fit, waterproofing, sole type, and activity.
Most Shopify themes include basic filtering through the native Search & Discovery app. Install it from the Shopify App Store if you have not already — it provides tag-based filtering across your collections without custom development.
Product card design
Your product cards — the individual product thumbnails in your collection grid — are doing a conversion job before the shopper ever reaches a product page. The information on those cards determines whether someone clicks through or keeps scrolling.
At a minimum, show the product name, price, a clear main image, and star rating if available. For collections where a key specification drives the buying decision — weight for backpacking gear, waterproof rating for outdoor clothing — include that specification on the card so shoppers can filter mentally without clicking through to every product.
Hover images — showing a second product photo when a cursor moves over the card — consistently improve engagement on desktop. Quick-add buttons that let shoppers add a product to cart directly from the collection grid reduce friction for buyers who already know what they want.
Reduce friction in the path to purchase
Every unnecessary step between "I want this" and "I have bought this" is a place where a buyer can change their mind. Reducing friction in your purchase path is one of the highest-leverage conversion optimisations available — and it compounds directly with your SEO traffic.
Simplify your checkout
Shopify's native checkout is already well-optimised and trusted by shoppers. Do not customise it in ways that add steps, remove payment options, or slow it down. The customisations worth making are those that reduce friction — enabling Shop Pay for one-click checkout, adding relevant upsells at the right moment, displaying a clear order summary throughout.
Reduce the number of decisions required
Every decision a shopper has to make on their path to purchase increases the chance they will pause, reconsider, and leave. Simplify variant selection — show size guides, include clear images of each colour option, and default to the most popular variant rather than forcing a selection. Simplify your shipping options — too many options creates decision paralysis. One clear free shipping threshold and one express option is usually enough.
Address objections before they form
The most common reason a shopper does not complete a purchase is not price — it is uncertainty. They are not sure the product is right for them, not sure it will arrive in time, not sure they can return it if it does not fit.
Address these uncertainties proactively on your product page. A size guide that is actually helpful, not just a standard chart. A specific delivery date, not just a range. A returns policy explained in plain language — "free returns within 60 days, no questions asked" — not legal boilerplate.
But local SEO is underused by most Shopify store owners for a simple reason: it feels like a different discipline from the technical and content SEO work that fills most guides. It is not. It shares the same foundation like structured information, consistent signals, and genuine authority. These are just applied to geographic search rather than topical search.
Here is how to optimize your Shopify store for local searches.
Understand when local SEO applies to your store
Not every Shopify store needs a local SEO strategy. A store that ships globally with no physical presence and no geographic focus does not benefit from local optimisation in the same way a store with a physical shop does.
Set up and optimise your Google Business Profile
Claim and verify your profile
Fill in every field completely
Incomplete profiles rank lower in local search. Go through every field in your profile and fill it in:
Category — choose the most accurate primary category for your business. This is one of the strongest ranking signals in local search. For an outdoor gear store, "Outdoor Sports Store" or "Sporting Goods Store" is more precise than "Retail Store." You can add secondary categories for additional product areas.
Phone number — use a local phone number rather than a toll-free number. Local numbers reinforce geographic relevance.
Website — link directly to your Shopify store homepage, or to a specific location page if you have multiple locations.
Hours — keep these accurate and update them for public holidays. Inaccurate hours frustrate customers and signal to Google that your listing is not well maintained.
Photos — upload at least ten high-quality photos. Include your shopfront exterior so customers can find you, interior shots of your store, product shots, and any team or lifestyle images that communicate your brand. Businesses with photos receive significantly more directions requests and website clicks than those without.
Maintain consistent NAP across the web
NAP stands for Name, Address, and Phone number. It is the core dataset that local search engines use to verify that your business is legitimate and that your information is accurate.
How to audit your NAP consistency?
Search for your business name on Google and look at every result on the first two pages. Click through to any directory or listing site that mentions your business. Check that the name, address, and phone number on each one exactly match your primary information.
The most common inconsistency sources are old listings that were never updated after a move or rebranding, directory sites that scraped your information at some point and never updated it, and social profiles set up years ago with outdated details.
Add location pages to your Shopify store
What a location page should include
What a location page should include
Location pages should include LocalBusiness structured data that tells Google your business type, name, address, phone number, opening hours, and geographic coordinates. This structured data reinforces your local relevance and can enhance your appearance in local search results.
Here is the basic structure:
Build local citations
General business directories — Bing Places for Business, Apple Maps Connect, Yelp, and Facebook Business are the highest-priority ones. These are widely crawled and trusted by local search algorithms.
Industry-specific directories — for an outdoor gear store, listings on outdoor activity directories, hiking community sites, and sporting goods directories carry extra weight because they are topically relevant as well as geographically relevant.
Local business directories — your city or regional business association, local chamber of commerce directories, and local newspaper or magazine business listings are strong local signals that national directories cannot replicate.
Map services — Apple Maps, HERE Maps, and TomTom all power navigation apps and voice search results. Claiming your listing on these platforms ensures your store appears accurately in map-based searches and voice queries like "outdoor gear store near me."
The process is the same for every citation: claim the listing if it already exists, create it if it does not, and ensure your NAP information is identical to your primary Google Business Profile.
Earn and manage local reviews
Reviews are the most powerful ranking signal in local search after proximity and relevance. A business with 80 reviews averaging 4.7 stars consistently outranks a business with 5 reviews averaging 5 stars — because review volume and recency matter alongside average rating.
For a Shopify store with a physical location, reviews need to be managed in two places: on your Google Business Profile and on your product pages. Both matter for different reasons.
Google Business Profile reviews
These directly influence your local pack ranking and are the first thing most local searchers see about your business. They are also visible in Google Maps to anyone navigating to your location.
The most effective way to earn Google reviews is to ask for them at the moment of highest satisfaction — immediately after a purchase, when a customer collects an order, or when you receive positive feedback. Make it easy by giving customers a direct link to your review form — go to your Google Business Profile, find your review link, and share it via a follow-up email, a card in the package, or a QR code at your till.
Respond to every review — positive and negative. Responses to positive reviews build rapport. Responses to negative reviews demonstrate that you take customer experience seriously and give you a chance to resolve issues publicly. Google's quality guidelines explicitly treat review responses as a trust and engagement signal.
Product reviews on your Shopify store
Product reviews appear in your structured data and can show star ratings in Google search results — making your listings more visible and more clickable. They also build purchase confidence for shoppers who find your store through local search and then browse your products before visiting or buying online.
Set up an automated post-purchase review request email through Judge.me, Okendo, or Shopify's native reviews feature. The optimal timing is two weeks after delivery — long enough for the customer to have used the product, soon enough that the experience is fresh.
Optimise for location-based searches on your store
Beyond your Google Business Profile and off-site citations, there are changes to make directly on your Shopify store that improve your visibility for location-based searches.
Include location keywords naturally in your content
If you are targeting local searches, your store's content should reflect your location naturally — not forced keyword repetition, but genuine mentions of the places your business serves. A collection description for hiking gear might mention "popular trails in the Norwegian fjords." A blog post on camping locations naturally includes location names throughout.
These geographic mentions help Google understand the context in which your store operates and improve your relevance for location-specific searches in those areas.
Create locally relevant blog content
Location-specific blog posts target searches with geographic intent and build your store's topical connection to your region. An outdoor gear store in Oslo might publish "the best day hikes from Oslo," "where to camp in Norway without a car," or "the top climbing routes within two hours of the city." These posts attract local searchers, link naturally to your product collections, and reinforce your geographic relevance to Google.
These posts also have strong backlink potential — local tourism sites, hiking blogs, and regional media are natural partners for geographically specific outdoor content.
Add hreflang tags for international stores
If your Shopify store serves multiple countries or languages — using Shopify Markets or a translation app — hreflang tags tell Google which version of each page to show to which audience. Without them, Google may show your English store to Norwegian searchers, or your Norwegian store to English speakers.
Most Shopify Markets setups handle hreflang tags automatically. Verify yours are correctly implemented using the Hreflang Tag Checker Chrome extension, especially after making any changes to your international market settings.
Capture branded and near-me search demand
Two specific types of local search deserve targeted attention because they represent high-intent, conversion-ready traffic.
Branded searches
When someone searches for your store by name — "Oslo Outdoor" rather than "outdoor gear store Oslo" — they already know who you are. They are either a returning customer or someone who has heard of you through word of mouth, social media, or a recommendation. Converting these searches is critical because the intent is as high as it gets.
Make sure your Google Business Profile is fully optimised so your knowledge panel appears correctly for brand searches. Ensure your homepage title tag includes your brand name and clearly describes what you sell. Set up Google Alerts for your brand name so you know when people are talking about you online.
Near-me searches
Searches containing "near me" — "outdoor gear store near me," "camping equipment near me" — have grown dramatically over the past several years as mobile search has become dominant. These searches are Google's job to match to relevant local businesses, and your Google Business Profile is the primary signal it uses.
You cannot directly optimise for "near me" searches the way you can for a keyword. What you can do is ensure Google has complete, consistent, and trustworthy information about your location — through your Google Business Profile, your website's NAP information, and your citation profile — so it can confidently show your store to nearby searchers.
SEO is not something you do once, especially for Shopify. Your store is always changing: you add new products, collection pages grow, and as traffic builds, you increase real data about what is working and what is not.
Here are the most important tools to measure your Shopify SEO success and reflect on your strategy.
Core SEO measurement tools
Google Search Console (GSC)
Queries report (Search results → Queries)
This shows every search term that brought someone to your store.
If you use Google Search Console correctly, you will gain important insights about your store's performance and find opportunities to update your product pages and discover content ideas for your blog posts.

Click on a specific page to see what it ranks for
Filter by a page URL and you will see every query that page appears for. This tells you what Google thinks your page is about. The results are often different from what you intended. For example, a collection page appearing for informational queries is a signal that a blog post should be handling those searches instead.

Click on a specific query to see which pages rank for it
If you click on a query, you will see which of your pages appear for it. If more than one page ranks for the same query, two pages are competing against each other for the same search. This is called keyword cannibalization and it is one of the most common structural problems on Shopify stores.

Find every question your store appears for
In the filter panel, select Query → Matches regex and enter:
This will show you every question-format query your store already appears for, which is goldmines for blog content ideas.

Find your long-tail keyword opportunities
In the same filter panel, enter:
This shows queries of four words or more that your page(s) are appearing. Long-tail searches are usually more specific, less competitive, and closer to buying intent.
If your store appears for them but has no content targeting them directly, those are ranking opportunities waiting to be captured.
Page indexing report (Indexing → Pages)
This tells you how many of your pages Google has indexed and how many it has skipped — and why. If you see pages marked as "Crawled — not currently indexed," tackle those first. It means Google found the page but decided not to include it in search results, which is often a sign of thin content or a technical issue.

Core Web Vitals (Experience → Core Web Vitals)
Core Web Vitals shows real speed data from actual visitors using Chrome. Check both mobile and desktop tabs separately, since your scores can differ significantly between the two. Any pages marked as "Poor" are hurting your rankings and need attention.

Product rich results (Enhancements → Products)
This tells you whether your structured data like product schema, FAQ, breadcrumbs, reviews, etc. are set up correctly and whether your pages are eligible to show prices and star ratings in Google search results. Errors here mean you're missing out on clicks that competitors with clean markup are getting.

Top linking pages (Links → External links)
This shows which of your pages have earned the most backlinks from other websites. Use it to identify your strongest content pages that worth updating and expanding because they already have authority behind them.

Sitemaps (Indexing → Sitemaps)
Confirm your sitemap is still submitted and working. Compare the number of URLs submitted against the number Google has actually indexed. A large gap between the two is a signal that something is blocking Google from reaching parts of your store.

Google Analytics 4 (GA4)
GSC tells you what happens before the click. GA4 tells you what happens after. Once a visitor lands on your store, GA4 tracks everything like what they read, how long they stay, and whether they buy.
Use Google Analytics for your Shopify store to:
see how much of your traffic comes from organic search,
find out which pages have lots of visitors but few purchases,
and measure how much revenue organic search generates over time.
After you connect GA4 to your Shopify store (see it in the chapter 1), make it a monthly habit to check the following key reports.
Traffic acquisition (Acquisition → Traffic acquisition)
This shows you where your visitors come from — organic search, paid ads, social, direct, and more. Filter by "Organic Search" to isolate your SEO traffic. Compare month over month to see whether your organic channel is growing, flat, or declining.

Landing page report (Engagement → Landing page)
This shows which pages visitors land on first when they arrive from search. Your top organic landing pages are your most important SEO pages — the ones worth keeping updated, fast, and well-optimised. If a page gets heavy traffic but low conversions, it's a sign the content or the page experience needs work.

Monetisation report (Monetisation → E-commerce purchases)
This shows which traffic sources generate the most revenue. Filter by organic search to see exactly how much money your SEO efforts are producing. This is the number that justifies your content and SEO investment — treat it as your primary SEO performance metric.

Engaged sessions (Reports → Engagement overview)
The Events report shows every action GA4 has recorded across your store — page views, scrolls, clicks, searches, and purchases. For Shopify merchants, the most useful events to focus on are:
purchase— confirms your e-commerce tracking is firing correctly and shows how many transactions GA4 is recordingadd_to_cart— shows how many visitors are adding products to their cart. Compare this against your purchase count to find your cart abandonment rateview_item— shows how many times product pages were viewed. A product with high views but low add-to-cart events is a signal that the page is not converting — the traffic is there but something on the page is causing shoppers to leavebegin_checkout— the number of shoppers who started checkout but did not complete a purchase. A large gap between this andpurchasepoints to a checkout friction problemsearch— if your store has a search bar, this shows what shoppers are typing into it. These are buying-intent keywords from people already on your store — useful for finding products to add, content gaps to fill, and navigation improvements to make
It depends on the event. GA4 tracks some things automatically the moment it is connected to your store — page views, scrolls, outbound clicks, and site searches require no setup at all. These are called automatically collected events and enhanced measurement events, and you get them for free as long as enhanced measurement is turned on in your data stream settings.
Purchase events are different. They only fire if your GA4 is connected to Shopify through the Google & YouTube channel app, or if your theme passes purchase data to GA4 correctly. This is the most important event on your store and the one most likely to be missing or misfiring. Always verify it by completing a test purchase and checking the Realtime report to confirm the purchase event appears.
Events like add_to_cart, view_item, and begin_checkout are sent automatically by the Google & YouTube app when it is properly installed. If you added GA4 manually by pasting a Measurement ID into Shopify preferences, these e-commerce events may not fire — you only get basic page view data.

Pages and screens report shows which pages on your store are getting the most traffic, how long visitors are spending on each one, and how often they result in a conversion.
No setup required. GA4 tracks every page view automatically from the moment it is installed. The Pages and screens report populates on its own — you just need to give it 24 to 48 hours to accumulate enough data before the report becomes meaningful.
The one thing worth checking is that your page paths are reading cleanly. Occasionally Shopify stores show duplicate page entries — for example /collections/tents and /collections/tents?sort_by=price-ascending appearing as separate pages. This fragments your data. You can clean this up in GA4 by going to Admin → Data Streams → your stream → Configure tag settings and adding URL query parameters to exclude.

vevy.ai
vevy.ai tells you which blog post made you money last week — or why one post converts readers into buyers while another one doesn't.
vevy.ai is built specifically for that gap. It connects your blog content directly to your store's revenue, so instead of seeing "organic search" as a single channel, you see exactly which post a reader was in when they clicked a product and bought it.
Use it to:
see how much revenue each individual blog post generates,
find out which sections of your posts readers actually finish,
and discover which content blocks drive the most clicks and purchases.
Once vevy.ai is set up, here are the four key reports to check regularly.
Top performing posts (Analytics → Posts)
This shows your best-performing blog posts ranked by revenue generated. You can see how many readers each post had, how long they stayed, how many product clicks it drove, and how many of those clicks turned into purchases. Use this to understand what makes your highest-converting posts work — then replicate it in every new post you write.

Paragraph engagement (Analytics → Engagement)
Most posts lose the majority of readers before the end. This report shows the read-completion rate for each individual section of your post — so you can see exactly where people stop reading. If readers consistently drop off before reaching your product recommendations, that's your signal to move them higher up in the post, not leave them buried at the bottom where most readers never arrive.

Content block heatmap (Analytics → Heatmap)
Vevy.ai's editor lets you build posts with 30+ inline content blocks — product showcases, collections, FAQs, CTAs, recipe cards, and more. This report shows you which block types get clicked most across all your posts. If product blocks and CTA buttons drive the majority of your clicks, you have a clear, data-backed reason to use them more often and place them earlier in your content.

Screaming Frog SEO Spider
Screaming Frog is a popular desktop-based website crawler. This tool crawls your site just like a search engine and helps you find technical issues like broken links (404 errors), identify duplicate page titles, orphan pages with no internal links pointing to them, etc.
If your store is small, you can use the free version to crawl up to 500 URLs.

Rich Results / Rich Snippets
For ecommerce SEO, it’s important to add structured data to your product pages, FAQs, recipes so Google can understand key details like price, availability, and reviews. If your markup is correct, Google may show prices and star ratings in search results.
Structured data can also help AI systems and LLM-powered search features understand and summarize your products more accurately when they crawl your pages. It gives them clear, reliable facts to pull from.
Use this tool to validate your schema markup and ensure your product information is eligible for eye-catching “rich snippets.”
Validate if there’s an issue with your structured data with the following free tools:
PageSpeed Insights (PSI)
Google treats page speed and mobile usability as ranking factors. You can use the PageSpeed Insights tool that grades your performance. You simply paste your store URL to get a performance score between 0 and 100. It provides a detailed Core Web Vitals assessment and specific diagnostics, such as identifying images that are too large or apps that slow down your code.
Use the PageSpeed Insights tool to ensure your buttons aren’t too small and your text is readable on mobile devices. This tool is also free.
It also has a Chrome extension - Lighthouse that you can use on any website.

Shopify Speed Report
Shopify Speed Report provides Shopify-specific performance insights and helps you see when theme changes, app installs, or added third-party code may be impacting your load times.
It helps you spot when your store’s performance drops and what changes may have caused it (like app installs, theme updates, or new code), so you can decide what to optimize—especially for metrics like LCP.
It’s built into your Shopify admin and free to use.


