


How To's
/
How to add products to a Shopify blog post: the complete guide
How to add products to a Shopify blog post: the complete guide
Embed single products, product grids, collections and checkout buttons in your Shopify blog posts.
3 min read
You can add products to a Shopify blog post with vevy.ai by dragging an e-commerce element into the post and choosing the product from your store. Readers then see the product's image, price and a buy button inside the article, so they can shop without leaving it.
Shopify's own blog editor doesn't let you embed products in a blog post unless you edit code. vevy adds six e-commerce elements to the blog builder, so you can turn any article into a shoppable blog post in a few clicks.
This guide covers every way to add products to your blog: a single product, multiple products, a whole collection, a product next to your text, and a checkout button. It also explains which element fits each type of post and where to place products so they help sales without hurting your SEO.
Which product element should you use in a blog post?
The right product element depends on how many products you want to show and how quickly you want readers to buy. Each e-commerce element in vevy shows products in a different way.
Element | What it shows | Best for | Where readers go |
|---|---|---|---|
Product Card | One product with image, title, price and one button | Mentioning a product in the flow of the article | Product page or cart, depending on the button |
Product Details | One product with variants, quantity, Add to Cart and Buy Now | Product reviews and posts about one main product | They buy from the post |
Product Grid | Several products in rows and columns | Gift guides, "best of" lists and shop-the-look posts | Each product's page |
Collection Grid | Up to two collections | Category guides and seasonal posts | The collection page |
Text & Product | One product beside your own heading and text | Explaining why a product is worth buying | The product page |
Checkout Button | A button that adds products to the cart and opens checkout | Bundles, kits and limited offers | Checkout |
Before you start
To add products to a blog post with vevy, you need the Starter or Pro plan, because the e-commerce elements are part of Starter. The Free plan includes the blog builder with the basic and layout elements, and you can upgrade any time from the Billing page in the app.
To embed products in a post you wrote in Shopify's own blog editor, sync the post into vevy first. Open vevy from the Apps menu in your Shopify admin and click Sync Shopify posts on the dashboard. Your existing posts then show in the Blog Planner, and you can open any of them in the blog builder.

To open the blog builder, open vevy from the Apps menu and click Create blog post for a new post. To edit an existing post, click it in the Blog Planner.
How to add a product to a Shopify blog post
To add a single product to your Shopify blog post, drag the Product Card or Product Details element into the post, then click Select Product and pick the product from your store.
Open your blog post in the blog builder.
In the Elements panel on the left, find the E-commerce group.
Drag Product Card or Product Details into the post, where you want the product to show.
Click the element to open its settings in the Block tab on the right.
Click Select Product and choose a product from your Shopify store.

Set up how the product looks, then click Save draft or Publish.
Difference between Product Card and Product Details blocks
Product Card is the compact way to embed a product in a blog post. It shows the product's image, title, price and one button, such as "View Product" or "Add to Cart", so it fits inside an article without taking much space.
Product Details is the full way to embed a product. It shows the product's variants, like size and color, a quantity selector, and Add to Cart and Buy Now buttons.

Readers can pick a variant and buy without leaving the post, which makes Product Details the best choice for product reviews and posts about one main product.
What you can customize in product block in a blog post?
The Product Card and Product Details elements share these settings:
Show the product image, title and price
Change the button text, for example "View Product" or "Add to Cart"
Product Details also lets you show the variant options, like size and color, the quantity selector and the Buy Now button.
How to add multiple products to a blog post?
To add multiple products to a Shopify blog post in one block, use the Product Grid element. It shows several products in rows and columns, and each product links to its own product page, where shoppers can complete the purchase.

Open your blog post in the blog builder.
In the Elements panel, find Product Grid in the E-commerce group.
Drag the Product Grid into your post.

Click the grid to open its settings on the right.
Click Select products and choose the products you want to feature.

Set the number of columns, the number of rows and the gap between products.
Choose whether to show each product's image, title and price.
Click Save draft or Publish.
The size of the grid sets how many products it shows. A grid with 4 columns and 1 row shows 4 products, and adding a second row lets it show 8.
What you can customize in product section?
The products in the grid
The number of columns and rows, and the gap between products
Show or hide the image, title and price
The font size of the product title and the price

💡 Pro Tip
In gift guides and "best of" lists, add a short paragraph above the grid that explains how you chose the products. Readers trust a list more when they know why each product is in it.
How to add a product collection to a blog post?
To add a product collection to a Shopify blog post, use the Collection Grid element. It shows up to two collections in one block, and each one links to its collection page, so readers can browse the whole category from your article.

Open your blog post in the blog builder.
In the Elements panel, find Collection Grid in the E-commerce group.
Drag the Collection Grid into your post.

Click the block to open its settings on the right.
Click Select collections and choose up to two collections.

Set the number of columns, the number of rows and the gap.
Choose whether to show the collection image, title and description.
Click Save draft or Publish.
What you can customize in collection section?
Up to two collections per block
The number of columns and rows, and the gap
Show or hide the collection image, title and description
The title font size and how the image fits its frame

Product Grid or Collection Grid?
The difference between a Product Grid and a Collection Grid is what readers click on. A Product Grid shows single products that you pick by hand. A Collection Grid links to a whole collection page, which always shows the products that are in that collection on Shopify.
A Collection Grid works best when the post is about a category rather than single products. For example, a post about choosing running shoes can link to your Running collection, so readers see every option you sell.
How to add a product next to your text in blog post?
To show a product next to your own text in a blog post, use the Text & Product element. It places one product on one side and your heading and text on the other, so you can explain why the product is worth buying right beside it.

Open your blog post in the blog builder.
In the Elements panel, find Text & Product in the E-commerce group.
Drag the element into your post.
Click it to open its settings on the right.
Click Select Product and choose a product from your store.
Write a short Title and a few lines of Content about the product.
Set up the layout and colors, then click Save draft or Publish.
What you can customize in the product and text section
Product position: the product on the left or the right
Product width: how much space the product takes, for example 40%
Vertical alignment: top, center or bottom
Gap, padding and corner radius
Background and text colors
💡 Pro Tip
Open the text with the product's main benefit instead of its name, and keep it to a few lines so the product stays the focus. Write in plain, natural language, because that is how shoppers search, and it helps the section show up in search results and AI Overviews.
On the Pro plan, you can also add sections to a post. A section places a product, an image or a video beside longer text, and you can choose its layout. See Sections and layouts.
How to add a checkout button to a blog post
To add a checkout button to a Shopify blog post, use the Checkout Button element. When a reader clicks it, the button adds the products you chose to the cart and takes the reader straight to checkout.

Open your blog post in the blog builder.
In the Elements panel, find Checkout Button in the E-commerce group.
Drag the button into your post.
Click the button to open its settings on the right.
Click Select products and choose one or more products to add to the cart.

Change the button text, for example "Proceed to Checkout".
Set the button style, size, color and alignment.
Click Save draft or Publish.
When you don't choose any products, the Checkout Button sends readers to checkout with their current cart. This works well at the end of a gift guide, where readers have already added products from the cards above.
What you can customize on the checkout button
The products the button adds to the cart
The button text, and a cart icon with **Show cart icon**
Filled or outlined style, size, colors and corner radius
Full-width button
💡 Pro Tip
A checkout button works best for bundles and kits. When a post explains a routine, like a three-step skincare routine, one button that adds all three products to the cart saves readers from adding each one separately.
How to show a product next to every blog post?
To show the same product next to every blog post, turn on the Sidebar product showcase in your template settings. It's a sticky product card that stays in view while readers scroll, and it's available on the Pro plan.

In vevy, go to Templates and click Template settings.
In the Elements tab, turn on Sidebar product showcase.
Choose the product, the position (right or left), the button label and the button action.
Click Save Settings.
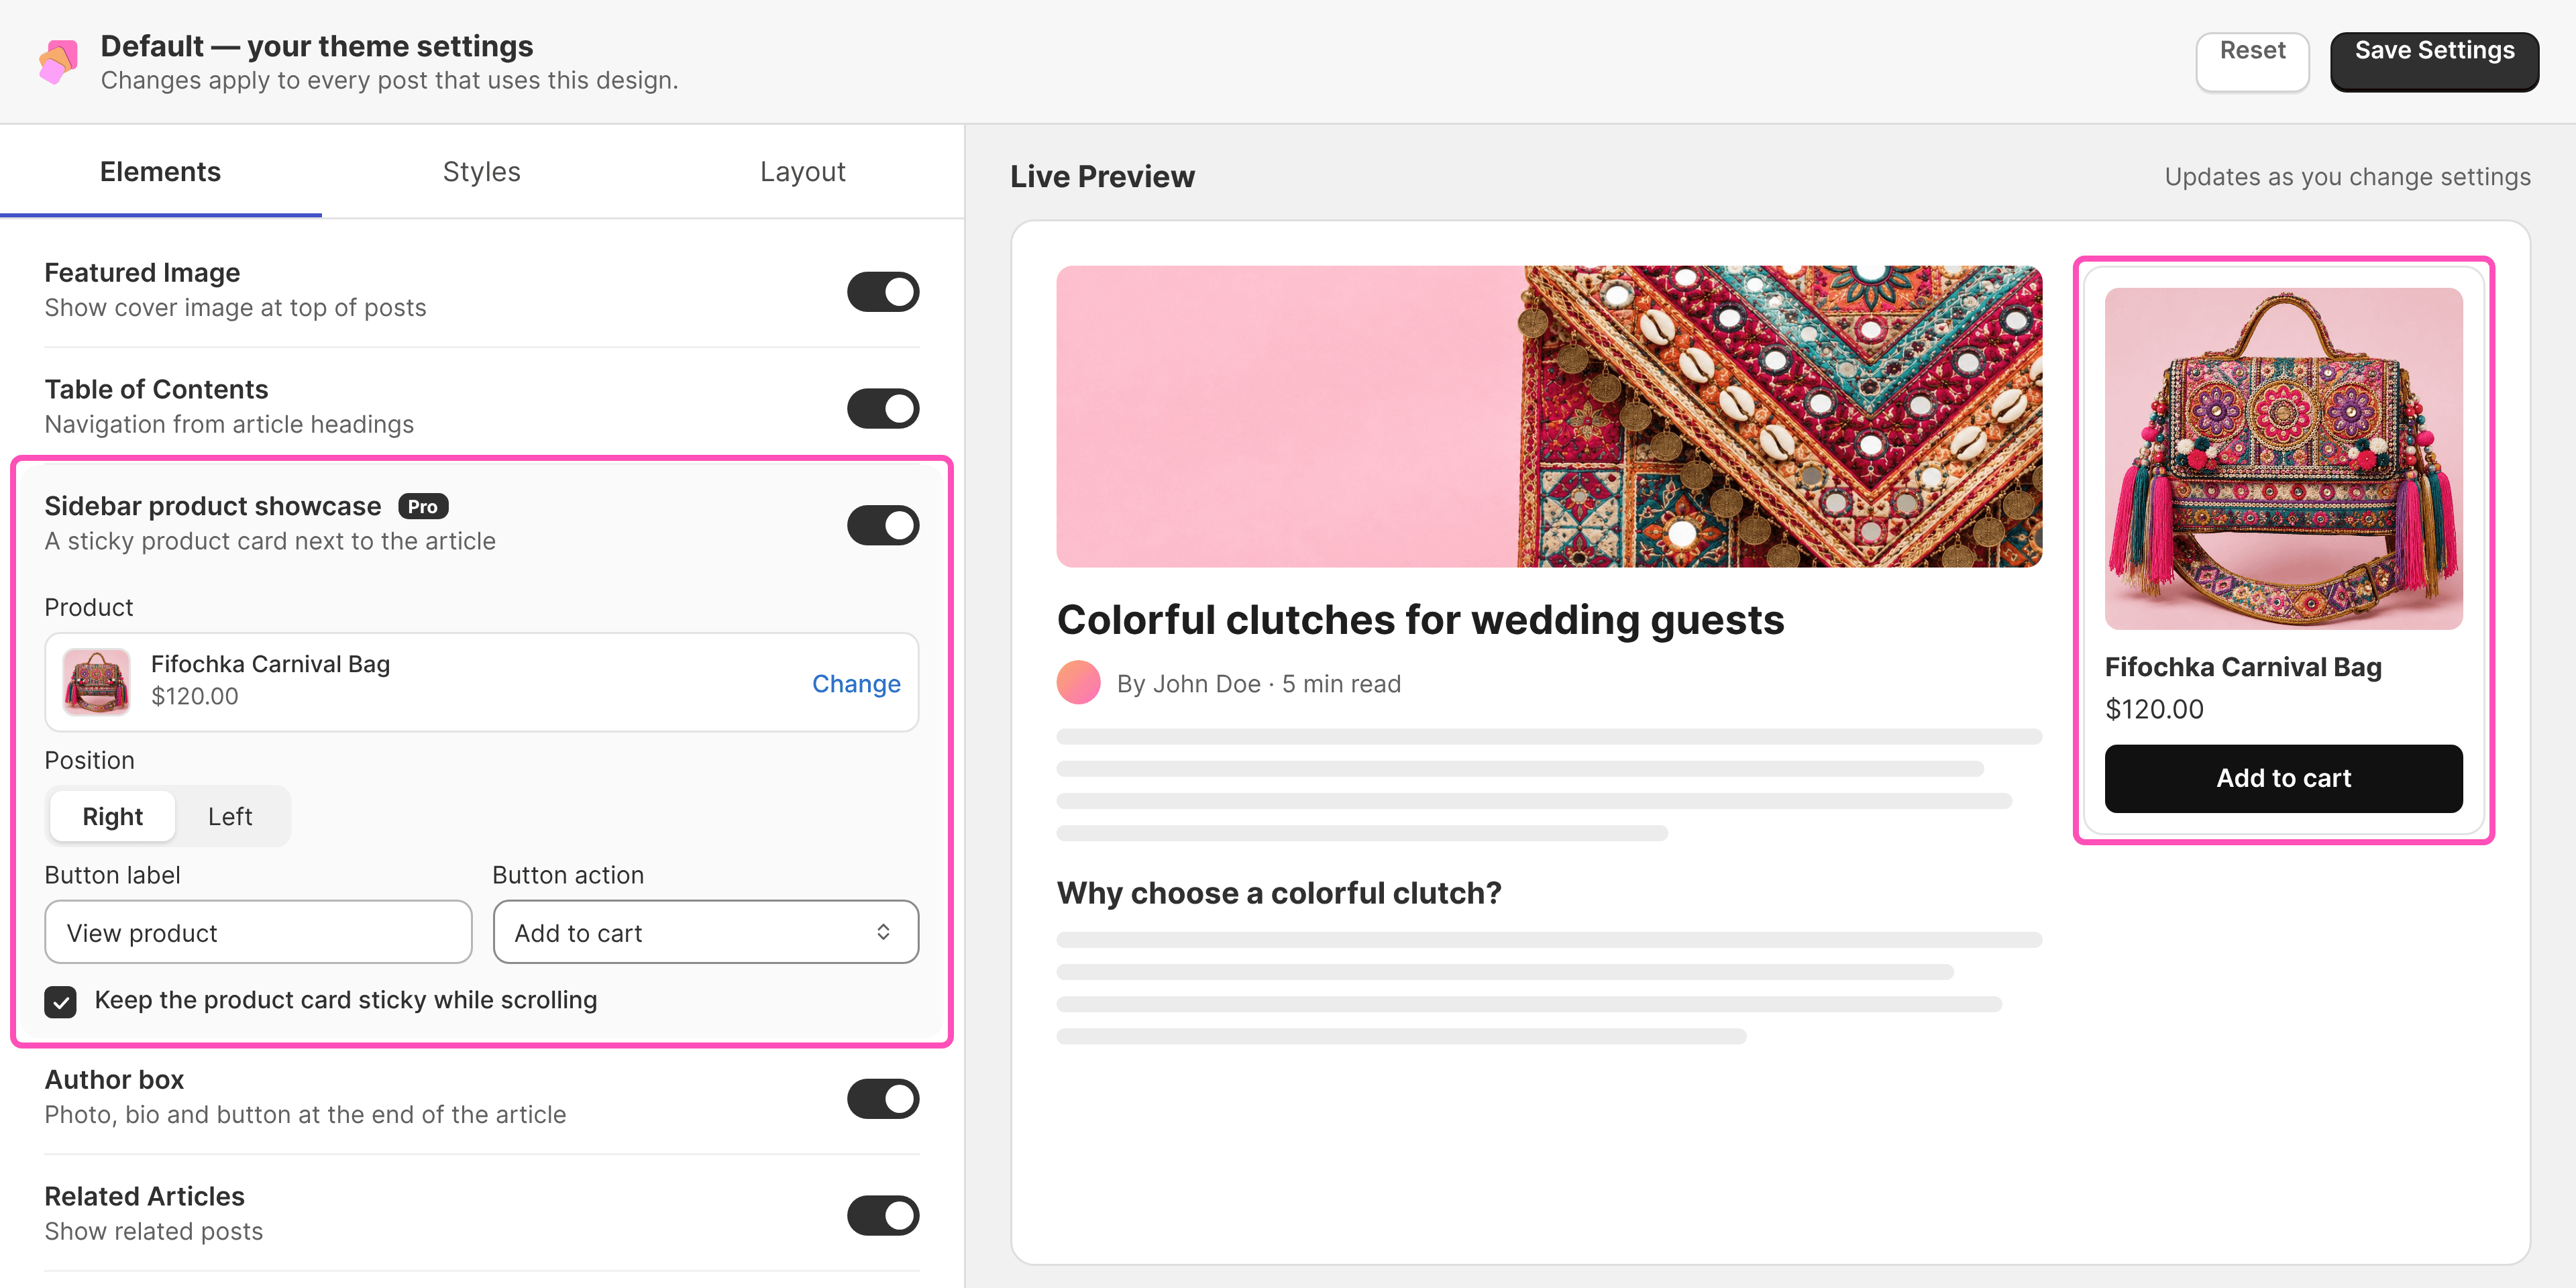
The sidebar shows with the Stacked layout. On small screens, it moves below the article. See Template settings for every option.
Where to place products in a blog post?
The best place for a product in a blog post is right after the paragraph that mentions it. Readers are most interested in a product at the moment they read about it, so a product placed there gets more clicks than the same product at the end of the post.
Add your first product early, after the introduction. Many readers never reach the end of an article, so a product that only shows at the bottom is easy to miss.
Keep one main product per section in long guides. When each section covers one product and ends with its Product Card, readers can compare options as they scroll.
Keep the number of products in balance with the text. When a post has more product cards than paragraphs, it reads like a catalog page, and both readers and search engines value it less.
End the post with one clear next step, like a Product Grid of everything you mentioned or a Checkout Button for a bundle. Readers who reach the end are ready to act, so give them one simple way to do it.
How embedding products in blog posts affects SEO?
Embedding products in your blog posts helps SEO when the products support the content, because each product adds an internal link from your article to a product page. These links help Google find your product pages and understand which topics they belong to.
Write the post for the reader first. Search engines rank articles that answer a question well, so the text should be useful on its own, and the products should support it.
Use the words shoppers search for when you mention a product in your text. For example, "waterproof hiking boots" in a sentence tells search engines more than "these boots" next to a product card.
Check how the post looks on phones before you publish. Most shoppers read blog posts on mobile, so use the device buttons above the canvas to preview the post and make sure every product card is easy to tap.
FAQ about e-commerce related elements
Can I add products to a Shopify blog post without an app?
Shopify's built-in blog editor lets you add text, links and images, but it has no product cards, product grids or buy buttons. To embed products without an app, you have to edit your theme's code or paste custom HTML into each post.
Which vevy plan do I need to embed products?
You need the Starter plan ($7/month) or the Pro plan ($39/month). Both include every e-commerce element: Product Card, Product Details, Product Grid, Collection Grid, Text & Product and Checkout Button. The Sidebar product showcase is on Pro.
Can readers buy without leaving the blog post?
Yes. With the Product Details element, readers can choose a variant, add the product to the cart and buy it from the post. The Checkout Button takes readers straight to checkout.
Can I add products to blog posts I already wrote in Shopify?
Yes. Click **Sync Shopify posts** on the vevy dashboard to bring your existing posts into vevy. Then open any post in the blog builder and add products to it.
How many products can a Product Grid show?
A Product Grid shows as many products as its columns and rows allow. For example, 4 columns and 2 rows show 8 products. To show more, add more rows.
What's the difference between a Product Card and Product Details?
A Product Card is a compact preview with the product's image, title, price and one button. Product Details shows the full product, with variants, a quantity selector, and Add to Cart and Buy Now buttons.
What happens to my product embeds if I downgrade to Free?
Products you already added keep showing on your blog posts. You can move or delete them, but you can't edit them or add new ones until you upgrade again.
📝 Note
Need help? Reach us through live chat on the vevy dashboard in your Shopify admin, or email support@grinduck.com